Showing posts with label spray paint. Show all posts

Monday, May 21, 2012

Pink Dresser Redo


Almost 2 1/2 years ago I stumbled upon
this little dresser at a local thrift store.

It was pretty sad looking and the drawers were a bit messed up.
After bargaining with the sales guy~something I'm proudly
getting better at~yup, I'm one of those gals
that if you look even slightly intimidating I'll just hand my cash over
and run away, I got it for $6.

So it has set in my garage and been chewed on by the squirrels
until I had any time to rescue it.
The exciting thing was that it's solid wood, no particle board crap here.
I gave it a good sand over and had to repair some corners.

Wood putty is amazing stuff~you can literally reshape missing corners.
Candace and I reshaped a whole table edge using the stuff eons ago
and you would have never guessed it at all.
So be brave and get some!:)

It did take almost 3 cans of spray paint to give it a luscious finish
and I was sure happy with the color.
I used spray paint because I knew it would stick.  
I didn't want to worry that I didn't get all the varnish off
so acrylic paint would stick.
Plus it's just easier!

My daughter and I have been working on redoing her room.
Gone is the Pepto-Bismol pink I agreed to when we moved in.
I know, I know, who listens to a 3 year old=2 thumbs pointing at me!
We have a warm butter yellow and now the pink is just a nice addition of pop.
 I picked the cute knobs up at Hobby Lobby for just over $7
and fixed the inner sliding hardware for $6.
 The knobs couldn't be more perfect!

So for right around $25
my daughter has a new dresser nightstand!
Now to find the perfect lamp......


Wednesday, February 2, 2011

Pottery Barn Art Boards

In case any of you guys missed our guest post over at Infarrantly Creative
we thought we'd post it again here at home!
Here's our latest project we've been working on.
Do you recognize these???
Here's our source of inspiration~~
These bad boys go for $169 a piece, yup each, so that would be a
grand total of $676 for 4.
Let me go grab my wallet......  
Yeah.
So here's where we started.
We printed off the picture and tried to measure them to scale.
If you don't own a quilting ruler, go get one, they are so useful!
We got 7 2x4 foot 1/4 inch MDF boards.
Home Depot was so good to cut everything out for us!
We used printer paper to make our patterns, which worked great
since it was already 11" high, we taped 3 sheets together to fit the 24" width
of the board and eyeballed the rest from there.
2 of the boards were cut into 3" slats,
1 was for the house tops
and the 4 remaining were for each house base. 
Each school house was 48" high except for the red one so we modified the pattern
to maximize the use of our boards.

I know looking at these it might seem overwhelming but remember...
YOU CAN DO IT!!!!
We know a lot of us get a bit nervous around tools,
but we Crafty Sisters really want to encourage you not to!
The jigsaw was one of the first tools we tried and it's pretty user friendly!
For this project you'll need:
A jigsaw, a drill, liquid nails or wood glue, paint,
sand paper and some clamps would be really useful!
(Although I have to admit my pantry was completely raided to clamp all of these down!)
We made the top portion 11 inches high.
Side slats were cut at 35 inches, the bottom was 24".
We used some 1x2" trim moulding for the chalk tray at the bottom.
It's easier to be exact with the roof line by layering the top piece,
 gluing it to the main house and then cutting it exactly. 
Less cuts, nicer finish.
Spray paint works best and gives the best finish!
Did you know that if you lightly sand between coats
it will make your finish look even better?!
Also following the directions on the back is always good (note to self).
Don't get too close and glob the paint.
It's better to do several thin coats then ruin it with one globby one.
Spray painting in cold weather isn't fun.
It stinks. Literally.
We're hoping the hubby doesn't notice the over spray of red on the garage floor.:)
Each house was then either inlaid with dry erase board,
cork board, or painted with chalk board paint. 
If using chalk board paint we recommend pre-painting the side slats and
then gluing them into place so you don't get chalkboard paint all over them.
Scared to cut dry erase board?  We were too!
Luckily we remembered a great tip we saw used on trimming doors to protect them from chipping:
Make sure to tape along the line before you score~
this will eliminate any chance for the finish to chip and flake up!

We also found a roll of white craft paper to hang from a dowel that
was held on by little corbels we made that attached to the base.
A little liquid nails holds everything in place
and spray adhesive worked great for the cork!
We attached "d" rings to the back for easy hanging.
All these things can be found at your local craft and hardware store.

We had to make one in pink for Nicole's daughter to display her
artwork and to organize her jewelery!
Candace's boys didn't need any coaxing to try them out either!
 These were pretty fun to make and actually pretty easy
but more importantly our kids love em'!
Plus our grand total was just over $75.
That's total....for 4!
Pretty fun huh?
Now, what to do next.....

Saturday, December 11, 2010

This Ain't Your Momma's Gingerbread House!

We are SOOOOO excited to share this fun project!
So how many of you love making gingerbread houses each year
and then cringe when you end up throwing them away
after spending $20 on candy then feeling like your
torturing your kids by wiggling it in their faces with the words
"Don't Touch It!  It's a decoration!"
And when they finally can it's stale, nasty and who knows how much dust has accumulated
or sticky little hands and tongues have already tasted the treats....
(This is Nicole talking....Yes, I have issues....) 
We have been dreaming this one up for a while now,
but have had our hands full with boutique season,
so when we finally got together it was so much fun!! 
At Michaels, we found wooden puzzle dollhouses that looked gingerbreadish to us. 
We're not going to lie...they were a beast to put together with vague directions,
but the results are fantastic! 
So, if you have an hour...or two...to put together this puzzle, we highly recommend them!
Don't forget to use your coupon!
We used fake candies on all of the houses, so they would last year after year. 
We found all the candies at Hobby Lobby. 
They were going fast, so most might be gone this late in the season.
We added bottle brush trees and used lots of Snow-Tex and glitter.
Nicole's gingerbread house was quickly taken over by Little Pet Shops!
Her little girl was in Heaven playing with the houses!
You have to glue these houses together for stability.
Nicole used tacky glue and Candace used a hot glue gun and wood glue.
I love this dollhouse because the back is open, letting little hands play and it also is easy to use lighting.
Spray paint works best!  It's much easier to get into the nooks and crannies of the house.
We found a brown spray paint by Krylon at Hobby Lobby.
We used a knife to add Snow Tex (love that stuff!) to the roof line. 
and our fingers to spread it all over.
We gathered our candies and mini-lights, snipping off the ornament hole and cutting off each light.
To match the sugared candies, we put spray adhesive on each light and added glitter. 
We used hot glue to attach each candy and light.
A set of mini snowmen were added along with mini wreaths.  So cute!
Nicole's daughter quickly moved the pet shops in! Staging them just so in the house.
"This ain't your Momma's Gingerbread House!"
How cute the sleds look on the front porch!
Of course there had to be a Christmas tree for her friends!
  Her daughter picked out beads for ornaments and they glued them to the tree.
Candace gave her house a "minimalist" wreath...hee,hee!:)
We glittered all the trim work with modge podge and glitter.
Candace used some spray can flocking snow on my house and got a little carried away....
Maybe stick with the Snow-Tex.
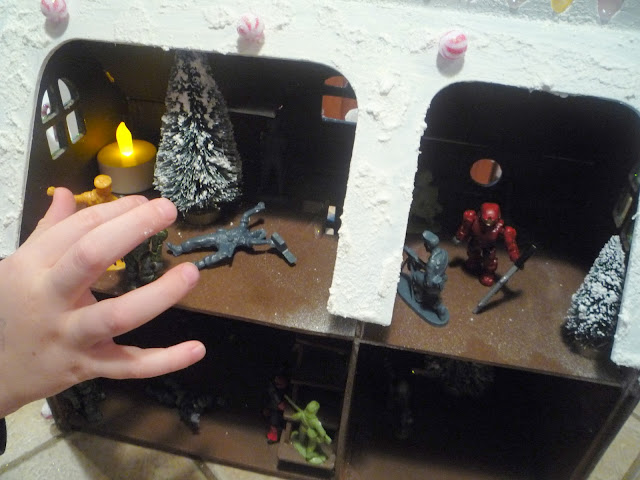
Candace's boys have their own version of playing house.....toy soldiers and Halo guys...
death by the Christmas tree!

We hope you guys like it!
They were a lot of fun to make with the kids and will be enjoyed for years to come!
And hey, they were less than $20 a piece to make too!

Happy House Building!!!
:)Nicole & Candace

UndertheTableandDreaming    Join us Saturdays at tatertotsandjello.com for the weekend wrap up party!

Wednesday, September 29, 2010

Eyeball Halloween Wreath

Oh, we had a lot of fun with this one.  Making something so creepy...yet pretty! I was heading out to the store the other day and my kids asked me what I needed to get.  "I need to pick up some eyeballs."  What?  I have seen tons of eyeball decor in the stores.  At Target you can get bags of eyeballs and even eyeball lights. 
The Target eyeball were a little small for our wreath, so Nicole and I thought of another idea. 
Ping pong balls! We found several packages at the Dollar Store.
They are just the right size for a wreath, although the eyeball lights would be fun too. A couple of years ago, the little boy next door told me that I have "green eyes"...like a witch.  What does that mean......huh? :)  He also told me that my red gardening clogs look like the ruby red shoes the witch wears in The Wizard of Oz.  Maybe he's been watching too much T.V.?  I sure hope so. Anyway, we painted our eyeballs with green paint and glitter...like witch's eyes.
I picked up this spring wreath from Walmart for 7.00 dollars and gave it a couple coats of black spray paint.  So easy!
We picked up three yards of netting and wired it on the back.  We then fluffed and pulled until it gave the wreath some body.
Here's the fur yarn we use on many of our Halloween decorations. We wrapped the wreath with yarn to add some cobwebs for the glittery spiders. We also tucked some white tulle circles in between the flowers.
What fun...it's a little creepy for my Halloween taste- but making those eyeballs was oh so fun! 
I have a black door, so I might add some lights so I can make sure to give the trick or treaters a scare......


Photobucket
Join us Saturdays at tatertotsandjello.com for the weekend wrap up party!
Related Posts Plugin for WordPress, Blogger...