Tuesday, September 25, 2012

Halloween Owls


I think it's about time to start Halloween crafting! Nicole and I love any excuse to be creative with spooky and silly things. We have seen tons of owls this year, so why not kick off the Halloween season with some wood owls?


I usually depend on Nicole to cut all of the wood shapes, but she is prepping for a boutique this week.  (She is making some cute stuff, we will share soon!) So, I reluctantly pulled out the scroll saw and cut three owl shapes out of wood.  Sadly, the cuts are far from perfect, but they will do.


After cutting the owl shapes out, I painted all sides with black craft paint. 


I used three circles of paper and mod podged onto the owl's belly.


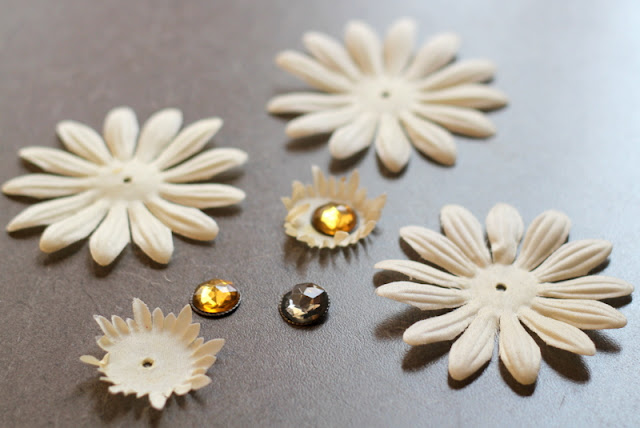
Next, I glued four layers of flowers together with a rhinestone sticker on top to mimic owl's eyes. The flowers are large for the owl's shape, so I trimmed around the edges before gluing onto the body.


Spooky, yet kinda pretty for owls?  The paper banner is from Tai Pan, I love it!

How about you?  Are you ready to pull out the Halloween decor?
Stay tuned for more Halloween projects. Nicole and I will have some fun ideas to share with you soon!

Friday, September 14, 2012

Banana Cake & Knock-Off Decor Feature

I tried a fantastic banana cake recipe that I found on Pinterest.  The recipe comes from
Butter Yum and it is called "To Die For Banana Cake" with Vanilla Bean Frosting.  The "to die for" and "vanilla bean" quickly caught my attention, it must be pretty good with a name like that.

The frosting calls for Vanilla Bean Paste, which I had never heard of.  After a quick Internet search, I found that Williams-Sonoma carries a great Vanilla Bean Paste from Nielsen-Massey.  Nicole and I had thoughts of making it ourselves (which you can) but after buying all the ingredients and waiting...it's much easier to buy it from the store.  It adds a distinct vanilla flavor and I love the pretty brown flecks in the frosting. 

So, if you have some extra ripe bananas hanging around in your kitchen, go ahead and try this recipe.  You will not be disappointed.


A HUGE thanks to Beckie from Knock Off Decor
 for featuring the Burlap Message Board!


Head on over and take a peak through Knock Off Decor, you will find tons of great "knock-off" inspiration!

Have a great day! :)


Tuesday, September 11, 2012

Burlap Message Board (Ballard Designs Knock-Off)


The kids are back in school and the paperwork is flooding in.  I have four in school this year and I'm afraid I might be buried alive in paper!  I found a cute wire basket at TJ Maxx to help cut the paper clutter,  it is somewhat similar to wire baskets that I spotted in the Ballard Designs Catalog.  I only wish it had one more basket!

While I was peeking through the catalog, I thought a Burlap Message Board would be great to go along with the new baskets.  (A knock-off, of course.)  I love a good knock-off challenge, it makes me happy to make something nice for less.
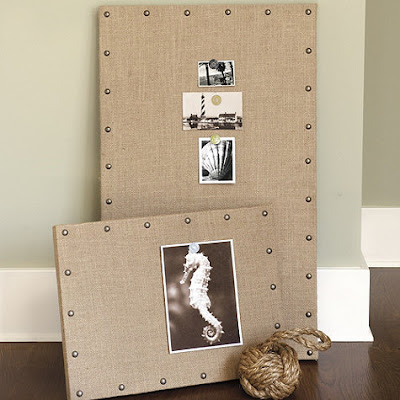


I was lucky enough to spot some great burlap in Home Fabrics last week that is almost identical to what is on Ballard's boards.  The burlap is thick and sturdy with a nice weave.  Perfect for a cork board.  I didn't know there were so many varieties of burlap beyond a potato sack!


I put the Message board in my kitchen area, where the clutter tends to pile up.  I wanted the entire under cabinet area filled with cork board, so I started by building a custom size wood frame.


Here are the supplies I used:

pine 1x2's
Foam Board (Hobby Lobby)
Cork Roll (Hobby Lobby w/coupon)
Burlap
Glue
wood screws
upholstery nails

tools:

staple gun
screw driver
drill
saw to cut 1x2's
rubber mallet


One of the reasons I like the wood frame so much is that I could "frame" around my phone jack and electrical outlets.  I built the frame deep enough to allow the cords to fit behind.  


After measuring my space, I started with the wood frame.  I made a rectangle with 1x2's and braced the center with two more 1x2's.  The braces are important to support the foam board and cork.  I used long screws and wood glue to attach everything, making sure to pre-drill to avoid split wood.

Next, I glued the foam board (cut to size with a box knife) to the wood frame with wood glue.  For extra hold I attached the foam board with staples.  Then I cut the cork roll to fit the frame and used spray adhesive to attach the cork to the foam board.  I then cut the burlap fabric to fit and stapled it to the back.  The corners are tricky, I folded mine on the top and bottom where I knew they would not be seen.
There's nothing worse to me than crooked nail head, it can ruin all of your hard work.  I made an "easy to follow" template to help me get the nail head on nice and straight.  First, I marked how far in I wanted the nail head. (About 1 inch.) I drew lines on each side of the paper one inch in. My nail head is about 4 inches apart (this depends on the measurement of your board) and marked dots on the line where the nail will go. 

Next, I cut a line on the paper with scissors on each nail mark.  Then I lined my template up on the corner of the board, pushed the nails in part way on the dots, then pulled the paper away.  It's super easy, then I moved on down the board with the template.  Before permanently hammering the nails in, I used my straight edge to double check that the nails were straight.  I finished hammering the nails in with a rubber mallet to avoid damaging the nails.

I used sawtooth picture hangers to hang the board on the wall. The open frame and foam board keep the board light!

Now I have a burlap message board that rivals a high ticket board from Ballard Designs for a fraction of the cost!  I am one happy and "semi-organized" gal!  


Wednesday, September 5, 2012

September Wood You Like To Craft


Today we are over at Wood You Like To Craft
sharing our take on September's theme
Crafting with/for Kids!

We are always excited for an excuse to do crafts for our kids and with them!
Here's an idea I've wanted to do for a while now!
We thought it would be fun to take one of our favorite shapes and turn it into a
fun chalkboard and jewelry holder, which was perfect for my daughter!
First we found a fun shape we used from a favorite old poster.
This was perfect since it looks just like our favorite kitty Morris~
My daughter has been begging for a kitty shape for a long time now
and I've been wanting to figure out a cute way for her to store all her own necklaces
so they aren't tangled up in my jewelry box....
so this was our perfect fit!
First I made up my pattern and traced it onto 3/4" MDF.
I cut it out with my jigsaw and scroll saw for the finer details.
I then painted it 3 coats worth of chalkboard paint.

I sanded in between coats lightly with a sanding sponge for a smoother finish.
I added 10 tiny hooks that I had spray painted black by pre-drilling holes first along the tail.
The tail was the perfect place for these hooks!
Then finished it off with a hook on the back for easy hanging.
Now I have the perfect place for reminder notes and a perfect place for her own necklaces!
Now I just need to find the perfect spot in her room to hang it up....
Make sure to head over to Wood You Like To Craft to 
see what the other gals have been up to!
Related Posts Plugin for WordPress, Blogger...