Friday, January 27, 2012

Love Notes

This week I had my Sunday school girls Activity Day
and my teaching partner and I decided to help them put
together some Valentine envelopes so that they could 
exchange anonymous admiration notes to each other
for our upcoming Valentine party.


My teaching partner Jill is one of the most creative people I know~
she is seriously amazing and we'll have to show off her crazy talent here soon!
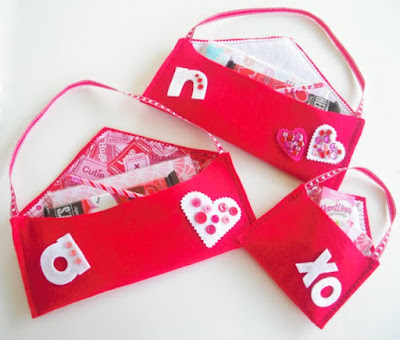
She came up with these cute envelopes that we let the girls,
who are 8-11 years of age then decorate and sew buttons on.

Of course I had to come home and make some up for me!
Candace has a houseful of sick kids this week and is under the weather too
so we have stayed clear except for the quick~Purell soaked hands~exchange
in my driveway for the pinking shears.:)  So this week I am missing my sis and her camera 
with the great pics she takes!
I love the elongated size of these envelopes and they were the perfect fit
for all those goodies we love to grab in the dollar bin at Target!
I made a couple to take to some of my friends
and even did a smaller version to hold some cute note cards I found too.
Here is the pattern I made up with the measurements~
We used primarily felt but I had to try one with some of the cute Valentine fabric
for the liner that I found at Hobby Lobby.
Some of the fabric was so cute I actually got some to make a dress for my daughter....
we'll see if that ever happens.  Probably by the time I get around to it, it'll have
to be a mini-skirt or something.:)

Pretty easy and pretty inexpensive to make
and it's for sure something you and others will love to get!

Tuesday, January 24, 2012

For The Birds

This weekend our little family
went to the
These are a couple of cool post cards I picked up there,
pictured on them are some of the birds we saw.
My husband had the opportunity to take a Birds of Prey class
the first week of January and was so excited to share
all the cool things he had learned with us.
The center had all sorts of activities for kids and their families
plus ~bonus~ it was free to get in that day!
It was a great excuse to go for sure!
My daughter has been a bit of a bird lover
for several years now, so this definitely was perfect for her.
The thing is, I didn't realize how much I would enjoy it too!
They had several live birds~falcons & eagles, even a pair of California Condors.
There were also plenty of "preserved" birds to look at too.:)
We spent most of the afternoon out bird watching,
we even spotted a great horned owl!
He was refusing to pose for the picture....
Then we came home to mount the bird boxes
we built on my birthday.
You can find several plans on the internet for building these simple boxes.
The Birds of Prey even have a great set of directions!
Click here to get them!
They are all simple straight cuts and each box costs about $10 to make!
We didn't realize that most owls and falcons do not build their own nests
so we are hoping to lure a few into our yard.
Of course only smaller ones that don't eat squirrels!:)

There is also a great app we found that was amazing!
It's called iBird Explorer Pro 5.
iPhone Screenshot 1
It's on sale right now and a must for bird lovers!
It has an amazing library of bird calls and facts.
We learned that most birds begin to migrate
back to Northern America in February
so we're going to have our eyes peeled!

What fun and educational things do you know about
in your neck of the woods?

Tuesday, January 17, 2012

Valentine Pennant Banner

There's nothing like a trip to the craft store to get our Valentine creative juices flowing.
We took a stroll through the scrapbook department at Craft Warehouse and fell in love with a line of Valentine paper by My Mind's Eye.  It's called "Love Me"
Once we saw the whimsical valentine pennant print, we knew we had to have one in "real life" size.
  We really don't need another pennant banner, ah...but the papers are so fun!
To make the banner, we picked up 3 x 2 1/2  inch chipboard pennants and chipboard hearts.

For the other pennant sizes, we used the paper cutter to slice squares, rectangles, 
 and a couple of larger pennants.
  
We used Mod Podge to glue the papers to the chipboard.
Then we used a small hole punch to make holes for the string. 
 It takes some muscle to punch through chipboard and a layer of paper!
It's so easy to make!
We might have to head back to the store to stock up on this cute paper before it's gone!

Wednesday, January 11, 2012

Valentine Picture Tree

We can't go into Target without heading straight for the dollar bins,
 especially when it's filled with Valentine's stuff. 
They had the cutest little Valentine trees,
 so two quickly went into our carts. 
They had a lot of potential! 

Here's a picture of the original tree....
 
Very cute...and very red.
Nothing that a little spray paint can't change.
We ended up painting the trees with Krylon Brushed Nickel spray paint.  
 For the ornaments, we had so much fun playing around with
a box of epoxy resin that Nicole bought three years ago. 
 At Hobby Lobby we found some embellishments and
metal bottle caps in the jewelery section  to make our resin filled ornaments. 
First we printed off thumbnail prints of our family members we love..
that includes Nicole's cats and squirrels. 
Yep, if any of you are new... Nicole is a squirrel whisperer
that has rescued several dying baby squirrels. 
We decided to make our own picture ornaments instead of hanging Valentine ornaments. 
It was the perfect opportunity to use that box of epoxy resin. 
It only took us three years to figure out what to do with it and these were perfect!.
We had tons of fun playing around with it and are already thinking of other ways to use it.
We used a product called EnviroTex Lite Pour-On in high gloss finish.
It was our first time playing around with it and we of course learned a lot. 
A little goes a looooonnnnnggggg way.
First, make sure your two part mix is correct with equal parts.
We marked with a sharpie equal spots down each bottle to help us measure accurately. 
Second, glue your pictures down. 
A glue stick might be a good idea so it won't ruin your picture. 
Third, there are tons of bubbles, so use popsicle sticks to continually press
the poured mixture to clear the air bubbles as the resin sets up.
 
Resin will be completely cured/dry in 72 hours.
Nicole wrapped her base with cream burlap while I gave mine
a pleated look with silver tissue paper.
We used the prettiest light pink pearls to dangle
from each ornament and matching ribbons for the bows.
Of course we had to add a little "frosting" of glitter too on the top of the pot and heart.
Two different but similar takes
and two very happy results!
I think these guys are staying up all year round,
they just make us happy!

Saturday, January 7, 2012

A New Year's....


I make at least one goal each year
and I usually don't do very well with it.
The last couple of years I didn't even bother.
Sound familiar?
This year I do have one goal I'm gonna totally follow through with.
I'm going to get healthy, no, not just lose some weight,
which would of course would be the added bonus,
but I want to feel good~most of the time.:)
Plus I have the dreaded high school reunion this summer.....
Enough said.
Right now we are obsessed with Smoothies!
Right before Thanksgiving I found out I have an ulcer.
Imagine that, after my crazy life during boutique season.  Shocking.
Doc said I needed to go on a 2 week no fat, no sugar, no white carb diet.
I thought I was going to die, not just from the ulcer but from
the lack of sugar, and I had to quit Dr. Pepper.

Surprisingly it wasn't that bad and I actually have felt
the best I have felt in a really long time.
I usually get really sick the  first part of December
when my body finally crashes.
I haven't gotten sick yet this year.
I was surprised when I did eat sugar again how sick I felt, immediately.
Of course for most of us it's totally ridiculous to be that strict but
we wanted to tell you guys about 2 sites that are inspiring us to get healthy.

Our sister-in-law from Texas has our whole family hooked.
Even our Mom who struggles with diabetes is doing amazing with it!

This lady is a local and my Mom and I have gone
to several of her classes, she is simply brilliant!
Her class on sprouts was amazing and we rushed right down and
got all of our sprouting necessities.
My daughter loves sprouts, begs me to grow them
and she gobbles them up!
Mary Ann also has classes on just about everything,
organizing your house to cooking from your car and food storage.
She is seriously hero-worthy!

To help us on our adventure with shakes
Candace picked up this cool gadget which was
on special today down at Costco.

It's the Magic Bullet!
It comes with 8 little easy to snap on cups that are single serving size.
They snap right into the base, and it's easy enough for little hands to do.
Add some fresh fruit, orange juice, ice and
you've got a smoothie that your kids will love!

Another recipe we love is to add vanilla Greek yogurt,
 cottage cheese, some frozen berries, banana and a little milk and ice cubes. 
 It's so creamy and good you won't want to share!

So far I've lost 20 lbs.
Nope I'm not doing a nasty before and after photo
although my daughter has done up a lovely one of me on the fat booth app....
So what are some of your New Year Goals?
How are you going to accomplish them!
Tell us, we need all the inspiration we can get!:)

Now....back to crafting!
Related Posts Plugin for WordPress, Blogger...