Showing posts with label holidays. Show all posts

Thursday, January 3, 2013

Beef Empanadas


My Hubby's birthday is New Year's Eve and this year his only request was that I make him empanadas.
He served as a missionary in Chile and he actually tried to make empanadas for me
on one of our first dates.
They were miserable and I barely choked them down, wishing I had a huge napkin
to hide everything in while I also tried to convinced him I was "The One".

It's been a long time since then and I finally got a real authentic recipe from our neighbor who was a missionary in Argentina.  They are delicious and our whole family pitched in to put them together!

Beef Empanadas
Dough:
8 cups flour
1 teaspoon salt
12 tablespoons (3/4 cup) vegetable shortening, melted
4 tablespoons (1/4 cup) vegetable oil
1 1/3 cup milk
1 1/3 cup water

Filling:
2 cups chopped onion
3 cloves garlic, minced
1 tablespoon vegetable oil
3 tablespoons chili powder
1 teaspoon ground cumin
2 lbs extra lean ground beef
6 hard boiled eggs, chopped
1 can olives, drained and sliced, black or green
1/2 cup raisins
Salt to taste

Prepare Dough:
Combine flour, salt, shortening and vegetable oil in large mixing bowl; stir to blend.  Heat milk in microwave until small bubbles appear around edges (about 4 min).  Add flour to mixture along with warm water.  Stir to form soft dough.  Knead on lightly floured surface until smooth (about 3 min).  Cover with plastic wrap and let rest 20 minutes.
Prepare Filling:
Saute onion in the oil in large skillet until tender and translucent, about 5 minutes.  Add garlic at the end.  Set aside onions.  Crumble beef into skillet, saute, stirring until browned.  Stir in chili powder and cumin.  Stir in olives, raisins, onions, and chopped eggs.

Form dough into 4 12" long rolls.  Slice each roll into 10 equal pieces and roll each piece into a 5 inch round.
Put about 3-4 tablespoons of the filling in the center of each round.  Moisten the edges and fold in half.  Press edges firmly together and twist along the edge to secure.  Each empanada should be very plump with filling.  Place on a greased cookie sheet until you are finished.

To bake: Bake in a preheated 400 degree oven for 15 minutes.
To fry: Heat oil till bubbles from immediately when a tiny piece of dough is dropped in oil.  Fry on each side until golden brown.  Drain on a paper towel lined plate.

Serve hot with salsa and sour cream.  We actually did a mixture of half sour cream half Chili Verde salsa for a dipping sauce and it was great!  I fried mine and they cooked so quick and were so good!  My daughter even ate them and that's a miracle in itself!  At 9 years old she has refused to eat anything besides chicken till this year~when finally the enticing smell of bacon cooking made her broader her horizon's as far as protein goes....

This makes a huge batch~for us 3 it means we've been eating empanadas every day this week.  We also made a few with just a cube of pepper jack cheese in them~which is great if you aren't brave enough to eat raisins, egg and green olive in the same bite!

I finished taking down all my Christmas decorations today.  Our kids only got 1 1/2 weeks off from school and it disappeared so fast!  We decided to put our blogging aside and enjoy them to the fullest.
I am happy that I get to put up Valentine stuff soon.  How long do you wait till you put up Valentines?

Saturday, November 17, 2012

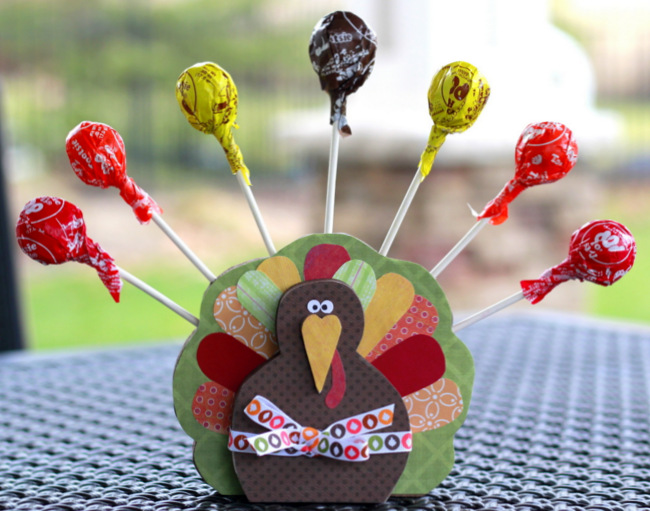
Wood Turkey with Crayons & Lollipops


I apologize for the lack of posts, right after Halloween my kids picked a croup virus that hit them slowly one by one, ending with me! I haven't felt much like crafting.  Nicole is busy on a fun project that involves knocking down brick walls in her home, hopefully she will be back soon to share.  

That leaves me on the scroll saw attempting several wood turkeys!  My son made a wood lollipop holding turkey in cub scouts that I thought was adorable, so I decided to make a few for either lollipops or crayons.  The turkey with crayons was a bit tricky because of the large drilled holes, I would suggest using a 2 inch pine board.  I used a 1 inch board only because I had it on hand in my garage.
The 1 inch pine board worked great for the lollipops, which my sons are much happier with anyway.  Nothing like making my boys more hyper than they already are with a little sugar while I cook!
I wish I knew how to attach printable patterns, for now this picture will have to do.  One day we will figure it out!  (If you want the pattern, you can blow it up on your computer screen.)
My turkey pattern is very simple, here's how I made it:  1 large cup and a cereal bowl from my kitchen.  The circle from the cereal bowl I folded in half and scalloped for the feathers.  For the turkey body I used one large cup and an Oreo I happened to be eating at the time.  An Oreo makes the perfect sized head for a turkey!   Yeah...it's really complex how we make our patterns around here! ;)

I used a small store bought wooden heart for the turkey's nose, my fingers are more valuable than cutting small wood parts for a turkey!
I added a straight edge to the bottom of the pattern to help the turkey stand up straight. I traced the pattern onto pine and cut with my scroll saw and sanded until smooth.  Next I drilled holes before I painted the wood edges brown.  If you are going to drill holes for crayons, start with a small bit, working your way up to avoid splitting your wood.  Last, I Mod Podged the wood with paper scraps and added ribbon.
Pretty simple and a fun addition to the Thanksgiving table.  

We'll be back soon, Nicole and I have been working on a few Christmas crafts to share with you! 

Thursday, December 29, 2011

Day 6 ~ Avocado Salad & Happy New Year!


Avocado Salsa
Sauce:
1/3 c. light olive oil
1/2 c. lime juice
1/3 c. apple cider vinegar
2 tsp. dried oregano
1 tsp. salt
1 tsp. pepper

Diced Vegetables:
1 (15 0z.) can corn niblets, drained
1 small can chopped olives, don't drain
1 pinch red pepper flakes
1/3-1/2 bunch green onion, chopped fine
1-2 cloves garlic, chopped fine
3 diced tomatoes
3 lg. avocados, chopped (add last)

Make sauce in a small bowl and set aside.  Mix diced vegetables in a large bowl. 
 Pour sauce over vegetables and enjoy. 

Nicole and I made this the other day and it was pretty tasty! 
  It's a great alternative to regular salsa. Serve with chips and even the little ones will eat this up.
The recipe comes from my friend Trina, she is an excellent cook and a mom to six boys! (my hero)
I will have to share her carrot chowder recipe sometime...it is so good!

Happy New Year! 
Wishing you a fun filled night of friends, family, and tasty treats!


Day 4~ Cranberry Salsa


Okay so this one sounds weird but it is seriously delicious!
My wonderful friend Carrie is one of the best cooks I've ever met. 
 She brought this over for us as a sweet Christmas treat
 and I admit I was skeptical and then I devoured most of it.....
Yup, "Lay off, man, I'm STARVING! [ pause ] Diet starts Monday!"
Sorry couldn't resist a bit of Chris Farley!

CRANBERRY SALSA
3 cups fresh cranberries, rinsed, drained (pick out any bruised or mushy ones)
1/4 cup green onions
2 small jalapeno peppers (seeds & ribs removed...
if you like it hot leave in some seeds, I probably leave in 1/8 tsp seeds.)
1/2 cup sugar
1/2 tsp salt
1/4 cup fresh cilantro leaves
1 T. very finely grated fresh ginger (can substitute 1/4 tsp. ground ginger)
Juice from 1/2 a lemon
2 8 oz. cubes Cream Cheese
Ritz Crackers

Place all the ingredients except the lemon juice and cream cheese
 into a food processor and mix until well chopped. 
Stir the lemon juice into the salsa. 
 Refrigerate for a few hours before serving to marry the flavors. 
There is enough salsa for 2 cubes of cream cheese. 
Serve by placing one of the softened cream cheese cubes on a
serving plate then pour 1/2 the salsa over the top. 
Have plenty of Ritz crackers on hand for dipping!

I actually put everything in the food processor and
I added the salt which can be omitted. 
The salt really helps bring out the flavors though.
You want the consistency to be really fine~
It's so good so enjoy!
Candace and I were busy in the kitchen this afternoon making a few more
recipes to share, so stay tuned to see what's next!

Tuesday, December 27, 2011

Day 2: Cheesy Corn Dip

This yummy recipe comes from
my sister-in-law Autumn.
Now that they are on the west coast
her and her little family have made the trek up to Idaho
for New Year's for the last couple of years.
My poor hubby has the misfortune of a December 31st birthday
so it has always made his day to have someone actually want
to come celebrate it with him
and cook him some good food!
Autumn comes ready to go
with almost a dozen tasty things to make up
that not only suffice for New Year's Eve
but for many days to follow.
This recipe is by far one of my favorites
and I've made it A LOT throughout the year
plus my picky eater daughter will gobble it up!

Cheesy Corn Dip
(No we are not sponsored by Walmart,
I simply went there today to check out the after Christmas clearance
and got my cooking supplies.):)

1 can Rotel tomatoes, drained
1 can corn, drained
1 can hominy, drained
1 tsp chili powder
1 tsp garlic powder
A  handful of finely chopped fresh cilantro
Salt/pepper to taste
1 8 oz package cream cheese
2 cups shredded Mexican style cheese
Mix all together, place in dish and bake until bubbly and hot in a 375 degree oven.
Serve with chips and salsa for extra kick!.
If you can't find Rotel tomatoes, any can of stewed tomatoes with chilies will work.
I admit I was a little nervous of the hominy too!
I had never tasted it before but it adds such a fun texture to the dip
I know you'll fall in love like I did!

Monday, December 26, 2011

Wet Your Appetite ~ Caramel Dip

Now that Christmas is over we are looking forward to celebrating New Years!
Every day this week we'll be sharing recipes of our favorite appetizers
that we love to do up for New Year's Eve and Day!
We promise that each one is super easy and absolutely delish!
First up is a yummy and super easy caramel dip made from sweetened condensed milk. 
Our sister-in-law from Texas just delighted us last week with this scrumptious treat.
Just take a can of sweetened condensed milk
and heat it in a pot of water over medium low heat for about 2 hours.
If you're up north it will take 2 hours but down in Texas it
takes about an hour. :)
Make sure to turn the can over every ten minutes so it cooks evenly.
(please excuse the gross BBQ'd tongs:))
Let it cool before you open it and then serve with sliced apples
or over ice cream, or anything else your heart desires!
Yummy and easy!
**We came across warnings that the can could possibly explode using the boiling in the can method. If you are worried...please use the double boiler method.  Open can, pour milk into glass dish, set dish over pan of boiling water, stir until thickened.**

Stay tuned tomorrow to see what's next!


Tuesday, December 7, 2010

A Baby Jesus Ornament

You asked for it....
and we listened!
We got a lot of requests for a tutorial for our Baby Jesus Ornaments
we did up for our Holiday Boutiques
so here it is!
This ornament is super super easy to make
and pretty inexpensive to do especially if you are wanting to do a bunch of them.
We saw a version of this several years ago and always wanted to make something like it!
So here's what we came up with!
First gather your supplies:
Acrylic Craft Paint (flesh tone & brown/black for eyes)
Tiny Grapevine Wreaths 3" size
Cream Felt
Craft Wire (we love it rusty!)
Wood Split Balls 1" size
Excelsior (you could use moss too)
Wood Stars 1" size (could use mini ornaments)
Hot Glue Gun
Spray Glitter (optional)
  Begin by painting all those baby heads a nice flesh color.
Here's a quick tip:
Tape a piece of masking tape sticky side up onto your counter
and stick your baby heads onto it.
Now you can paint those heads easy
without them moving around or dropping them!

Pre-drill little holes in your stars so you can thread them through the wire.
I spray painted mine a pretty gold color and "antiqued" them
by misting some Brown spray paint over them.
We like to mist stuff to kinda mix up the colors.
It's a really easy technique and gives a fantastic result!
Plus if you "mist" it too much you can always go back with your original color to make it right!
Cut your wire in 18" pieces.
I know, it seems like a lot, but once you curl it you'll understand!
 A sharpie marker is a perfect diameter for this!
 Next take the felt and cut out a 4 1/2  x 4 1/2" square for the blanket.
Fold in half and and trim off the bottom corner at the 3" mark.
It will look like a diamond jewel shape.
Cut another piece 2x 3".  This will be the body.
We've used fiberfill in the past but it's a pain to work with
and rolling up the felt was so easy!
Just make sure you get some glue around the edge of the face
to hold the felt in place!
I always paint my eyes on last.
You are a miracle worker if you get that head glued on
and the eyes are actually in the right place.
We usually use the end of a tiny paint brush or a brad nail to make the eyes.
Then thread the wire through the sides of the wreath and twist securely in place.

You know us and our glitter.....
We just had to add a touch of it to really finish this little guy off!
There you go, one beautiful little Baby Jesus!
These are great gifts for your neighbors and friends!
This batch is for my little group of girls I teach in my Sunday school class!

Monday, December 6, 2010

Peppermint Wreath

I love the peppermint decor this year.  I was strolling through Home Depot and found Martha Stewart's candy cane line.  I picked up a box of over sized candy canes and thought they would make a fun wreath. 
I used a fresh wreath from Costco, MS candy canes, peppermint picks and berries from Hobby Lobby. For the ornaments, sadly...I plucked them off of my "broken" ornament wreath from last year.  I loved that thing...darn it! I didn't put it in a safe spot, and it was smashed to the ground. At least I salvaged some ornaments from it? 
I wired all the candy canes and ornament balls on- to hold up in the cold weather- and hot glued all the picks.
It makes me happy! :)
I wanted to make it fun for the kids outside.  My boys don't get too excited over all the fancy Christmas decorations...


Sharing with,
&

Thursday, December 2, 2010

It's Christmas Mantel Time!

FRESH vs. FAKE
I couldn't decide which to use so I used both!
They make my home smell great and I was able to use a cheap lit-up garland I had on hand with a fresh cedar garland and I was very happy with the results!
(Eddie Ross gave this great tip of mixing greenery here)
The fake garland makes a great backdrop filler for the fresh garland.
You gotta love those Costco wreaths! 
Not only are they pretty inexpensive but they are gorgeous!
I added some glitter and paint to the pine cones and berries and wove in a few fake boxwood sprigs here and there around the silver glass candlesticks and ornaments from Target.
 **Note to self...do not use glass ornaments next time.  The fireplace is not shatterproof!**
 Running short of the fresh greenery...I grabbed some from my backyard...there's a bunch and it's free!
Remember all those mismatched frames from the Model Home furnishing sale?
  Can you believe this was in the unwanted/almost free section!? 
I don't think anyone could get past the urn pictures. 
After a quick trip to a glass shop I now have a new mirror. 
I was really happy with how it turned out plus it was much less than buying a new mirror of that size. 
Hanging that mirror was so hard!  It is definitely a two person job.
  I hope my husband doesn't peek behind there and see a dozen holes in the wall....oops!:)
I gotta keep moving on....I still have to put the tree up!
Nicole and I have a couple of fun Christmas projects to share soon...yay the two of us!
If only there were more hours in the day!

Sharing the mantel over at The Lettered Cottage....better late than never! :)
The Lettered Cottage

Sunday, November 28, 2010

A New Ginger Man

Here are some wood projects from a few weeks ago. I need to get my Christmas crafting wind back to decorate my house...I think I lost it after eating all that pie! :) I am currently "borrowing"  my dad's belt sander. It scares me, but it is great for wood crafts.  It quickly gets the job done and can quickly take the skin off your fingers!  Perfect for rounding out the Gingerbread parts.  My friend Angela gave our family this gingerbread man, that has been well-loved by my boys for 7 years.  One of them even practiced their writing on him. Nice. The boys look forward to pulling this guy out every year.  I think Angela bought kits, and then decorated them herself.  Cute idea.
He was looking scraggly..so we traced and cut out a new Gingerbread Man.  At first he didn't have a mouth and for some reason that really upsets my young kids...not sure why? I later added a mouth topped off with two small peppermint candy beads.
I think he's a door hanger, at least that's where we stick him.
We found all the candy decor, rick rack, cinnamon sticks, and ribbons at Hobby Lobby.  Everything is going fast, I can't believe it! To give him a sugared look, we sprinkled clear glass glitter over Mod Podge.

While I had the belt sander out I had to make Under My Polka Dot Umbrella's cute 2x4 snowmen. Nicole found her site and adores her wood crafts.  Have you seen the super cute stuff she makes with simple 2x4's? Really....really easy to make. I love the tree too!  Go check it out!
We'll be back soon with more Christmas ideas!

Wednesday, November 24, 2010

Thanksgiving Corn~Kid's Craft


While you're slaving away in the kitchen, here's a little craft to keep the kids busy.  We made these a few years ago in my son's class and it was so easy.
You will need beads, raffia, pipe cleaners cut in two, and corn husks.
I think that's a pretty good mix of authentic corn colors in the beads, don't you think?:) 
Have your little one bead them on.  He's been practicing in preschool and is quite good! 
We thought 5 rows was a good number for our corn. 
Twist the ends together. 
We dampened the corn husks before tying so they wouldn't crack. 
Tie the ends with raffia and trim it up. 
Super easy! 


This is sure to keep their little hands busy for a bit so you can bake away. 
 We'll be back later to share our mom's winner pie crust!

Sunday, November 21, 2010

Snowman Cubes

 I fell while holding my camera, taking the pine cone wreath pictures.  I stood up on an ottoman, and it tipped.  I smashed the front in.  I was able to pry the front lens back into shape enough for it to function, but the pictures are all blurry.  Santa, do you think you could send me a new camera...preferably a Canon Rebel?  I have been coveting them at Costco.  I was at a cub scout pack meeting and I spotted the Costco camera right away on one of the moms.  She asked if I would take a picture of her family while he was awarded.  One shot, and I was hooked! I was swooping in left and right capturing this great moment with their family! (he,he) I went into the camera shop to get a little info and found out they have built in HD Video.  Is that enough to convince my husband....uh, Santa? :)

So, here are some blurry pictures of these cute snowman blocks!
Ear muffs...or no ear muffs?
I made a dozen of these guys for the boutique Nicole's been involved in.  The ear muffs took some time to make, I gave up after three.  The first day of the boutique, a lady bought the three with the earmuffs. Later that night,I spent a couple of hours making 8 sets of earmuffs.  Clipping pieces of felt with wire, then attaching them to pipe cleaners.
All of them sold, except one lonely snowman I missed.
They are super easy to make. Nicole gave me a 4x4 post that we chopped into cubes.  
I gave them a good sanding, using a belt sander. (scary...but cool tool)
Chopped up some noses and glued them on. 
 I later gave them all a nose job, because their noses were too big for their face. :)
I pulled out my trusty celluclay and texturized them.
After drying, I sanded and then painted white. 
Then I added Snow-Tex.  Love this stuff. I wiped it around the edges and the nose.
Then I Mod Podged and added some glitter. These snowman blocks are really cute with plain old paint, if you don't want to bother with the texture and glitter.
I think it's really tricky making a snowman's face cute.
I have made many, many ugly snowman faces.  You can ruin it with the nose shape, or by the eyes.
 To make it easier, I found some tacks and spray painted them black.
Nicole showed me this trick of sticking them into cardboard for easy spray painting.
I drilled holes and glued the tacks into the block.
  Much easier then trying to draw a face on.  It was so funny watching my boy's faces when I would add the eyes, nose, and mouth.  The little one would point and laugh every time I added the earmuffs.  I got a kick out of watching them.
We had our first small snowfall,
my boys managed to scrape enough snow out of the yard to make their own snowman.  Cute!
Speaking of cute...here's a sample of what Nicole was making.  I had to snag a picture of her tray full of baby Jesus ornaments that sold like hotcakes!  Love these!
Related Posts Plugin for WordPress, Blogger...