Showing posts with label wood. Show all posts

Tuesday, February 26, 2013

Lego Shelves


My sons are Lego fanatics.

Our house runneth over with Legos.  Legos are all they ask for at Christmas, birthdays, and when they want to spend money earned from jobs.  With four boys, that equals a lot of Legos. In order to prevent all of their creations from ending up like this.....


We built shelves away from little hands.  I look at this bucket and think of the hundreds of dollars sitting in a bucket from my first son.  It's all good though, because this is where they come up with their own creations. Which is the beauty of Legos!

We love this "City Lego" line too much to see it end up in pieces. The boys love pulling all of the sets down and playing with them. Hours and hours of fun!  So, with the help of my second Lego loving son, we put together simple shelves over this past Christmas break to give the Legos a home.  

We used inexpensive black shelf brackets from Home Depot and (1x8) pine boards.  We love the deep boards, they work well to hold the large Lego sets. My son helped me stain each board with a grey stain from Minwax. We put the brackets up and secured each board with screws.  Super easy! 

My sons love the shelves.  They are the official designated spot in the house to proudly display (& protect) all Legos....spoiled boys I tell you! How about you?  Do you have any great Lego storage ideas? 

We found this clever idea of how to store and organize Lego directions at meredithanderic.blogspot.com. I put my son to work on that project too!

Nicole and I are getting together tomorrow to work on a few Spring projects.  We are so ready for Spring!

Monday, October 8, 2012

Wood Witch Silhouettes


Feeling Witchy?
We couldn't pass up making some fun Wood Witch Silhouettes
after seeing the My Mind's Eye Halloween paper this year.
We had so much fun earlier this year making silhouettes for our kids- that
this project was a definite "to-do" on our Halloween craft list!
My Minds Eye's Haunted Paper Pad had all sorts of wicked silhouettes
and the witches were just calling out~cut me...cut me.....
(We found this MME 6x6 paper pack at Michael's Craft store.)  We had trouble finding it online.


After blowing the images up on the computer, they were traced and cut out of 3/4" MDF.
MDF is so great to cut detailed work out like this because it cuts like butter
and doesn't chip or splinter like pine wood does.  (Be sure to wear a good mask when cutting MDF!)

I found myself cackling out loud as each wart, each rotten tooth and crazy curves on the hats were cut.
These Witchy gals are creepy and fun!
The witches were then coated in a semi-gloss black spray paint,
making sure to sand lightly between coats for a smooth finish.
Then they were finished off with a quick alligator hook on the back for easy hanging.

I made a few of these up for the boutique secretly hoping they wouldn't sell so I could keep them all to myself...but it looks like I'll be out cutting some of these ladies again!


Aren't they so fun paired with these witch potion making ingredients? We found the bottles at Hobby Lobby, and the potion labels are from The Graphics Fairy.  She always has great Halloween graphics you can easily find and print!  

*If any of you don't want to give these witchy silhouettes a try on the scroll saw, I cut out extra.  
Just contact me here!

Our Goose Creek Candle giveaway is still going on!  Hurry and enter to win a yummy scented candle, perfect for the fall season! 

Tuesday, September 11, 2012

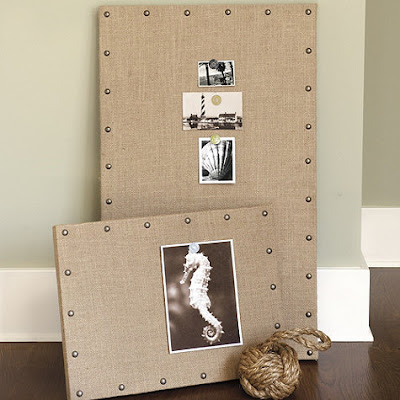
Burlap Message Board (Ballard Designs Knock-Off)


The kids are back in school and the paperwork is flooding in.  I have four in school this year and I'm afraid I might be buried alive in paper!  I found a cute wire basket at TJ Maxx to help cut the paper clutter,  it is somewhat similar to wire baskets that I spotted in the Ballard Designs Catalog.  I only wish it had one more basket!

While I was peeking through the catalog, I thought a Burlap Message Board would be great to go along with the new baskets.  (A knock-off, of course.)  I love a good knock-off challenge, it makes me happy to make something nice for less.


I was lucky enough to spot some great burlap in Home Fabrics last week that is almost identical to what is on Ballard's boards.  The burlap is thick and sturdy with a nice weave.  Perfect for a cork board.  I didn't know there were so many varieties of burlap beyond a potato sack!


I put the Message board in my kitchen area, where the clutter tends to pile up.  I wanted the entire under cabinet area filled with cork board, so I started by building a custom size wood frame.


Here are the supplies I used:

pine 1x2's
Foam Board (Hobby Lobby)
Cork Roll (Hobby Lobby w/coupon)
Burlap
Glue
wood screws
upholstery nails

tools:

staple gun
screw driver
drill
saw to cut 1x2's
rubber mallet


One of the reasons I like the wood frame so much is that I could "frame" around my phone jack and electrical outlets.  I built the frame deep enough to allow the cords to fit behind.  


After measuring my space, I started with the wood frame.  I made a rectangle with 1x2's and braced the center with two more 1x2's.  The braces are important to support the foam board and cork.  I used long screws and wood glue to attach everything, making sure to pre-drill to avoid split wood.

Next, I glued the foam board (cut to size with a box knife) to the wood frame with wood glue.  For extra hold I attached the foam board with staples.  Then I cut the cork roll to fit the frame and used spray adhesive to attach the cork to the foam board.  I then cut the burlap fabric to fit and stapled it to the back.  The corners are tricky, I folded mine on the top and bottom where I knew they would not be seen.
There's nothing worse to me than crooked nail head, it can ruin all of your hard work.  I made an "easy to follow" template to help me get the nail head on nice and straight.  First, I marked how far in I wanted the nail head. (About 1 inch.) I drew lines on each side of the paper one inch in. My nail head is about 4 inches apart (this depends on the measurement of your board) and marked dots on the line where the nail will go. 

Next, I cut a line on the paper with scissors on each nail mark.  Then I lined my template up on the corner of the board, pushed the nails in part way on the dots, then pulled the paper away.  It's super easy, then I moved on down the board with the template.  Before permanently hammering the nails in, I used my straight edge to double check that the nails were straight.  I finished hammering the nails in with a rubber mallet to avoid damaging the nails.

I used sawtooth picture hangers to hang the board on the wall. The open frame and foam board keep the board light!

Now I have a burlap message board that rivals a high ticket board from Ballard Designs for a fraction of the cost!  I am one happy and "semi-organized" gal!  


Friday, March 23, 2012

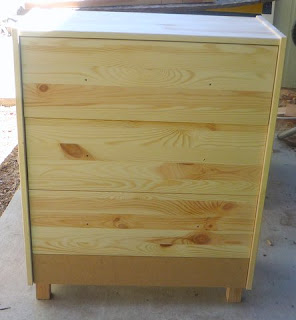
IKEA Rast Dresser Makeover


We are excited to finally show you our IKEA Rast dresser makeover. I say "our" because it involves the design of Autumn, and the wood skills of Nicole. We have given you a couple glimpses of the unfinished dressers over the year, but we really wanted to wait until the room was finished to give you a good look. 

Autumn, Nicole's Sister In- Law, helped me design my bedroom and the dressers into night stands.
She wanted us to knock off the night stand above...she describes the plans over at her blog,  Design Dump.

So, we started with a pair of Ikea Rast dressers.  I ordered them online for about 30 dollars a piece.
Nicole and I sketched out the curve pattern on paper, by alternating a paper arch.
In order to add our decorative legs, we had to brace the bottom with 2x4's and 2x2's.
The curved legs were also cut from mdf and nailed in on each side with a mitered corner.
We added a fake drawer to the bottom with a piece of mdf cut to size.
Here is one of the dressers ready to be finished with the wood veneer curves that Nicole cut out of 1/4 inch mdf with a scroll saw. We also added a piece of mdf to each dresser top, Nicole routered the front edge to give the night stands a finished look.

My sister has some serious wood skills to cut these curves out! I owe her...BIG time...like one of my children...(just kidding).. for all the effort she put into these dressers.  She was able to match up the lines with each drawer and they still have the ability to open.
Nicole brought over her paint sprayer and helped me paint the dressers with Benjamin Moore's Dartsmouth Green.  The finish is so nice because of the paint sprayer. Another trick to a great finish is lightly sanding between coats. For protection, we finished the dressers with a Polyurethane spray.
I just love them in my room!  They are the perfect little night stands. We haven't quite figured out what to do for knobs.  Do you have any ideas? I'm tempted to leave them as is.

Thanks Autumn and Nicole for all your hard work! I will be back to share the headboard, it was a little tricky hanging the thing.  Thank goodness for wall spackle!

Friday, March 9, 2012

Wooden Silhouettes

We couldn't resist!
After working on the fun Bunny Silhouettes
for Wood You Like To Craft,
we had to make some more!
Candace has been wanting to make some of her boys
and I couldn't wait to follow suit!

There is a really great (and easy!) tutorial for creating
a great silhouette picture to use from Design Dazzle.
They are so fun on paper but you know us and our love
of using wood~we thought it would give the silhouettes some great dimension!

After we took some pictures
we printed them off and cut them out with scissors
to make our pattern.

Candace traced her silhouettes directly from the computer screen,
sizing them to an 8x10 image.
Next, we traced directly to the wood.
 You can use pine, mdf, or whatever scraps you may have on hand.
We found that a scroll saw works best to cut out the fine detail in the face.
Be sure to wear a mask and eye protectors!
We ended up just spray painting them with a glossy finish.
Candace sprayed hers in a dark brown
hanging them with ribbon from 
cute decorative drawer knobs from Target.
I sprayed my daughter's silhouette in a glossy black
and adhered the ribbon with a really hot glue gun.
I found some really cute knobs from Hobby Lobby
but I'm still deciding on where to hang it.
I have to say how special this project was!
I've seen a ton of silhouettes around and yes, they look cool and all,
but there is something about seeing the details of your own child
the pout of their lips, their cowlicky rooster tails and their little chins....
They just make us smile!
Definitely a project to put on your list to do!

Our Wood You Like To Craft Linky party starts tomorrow
so make sure to head over and link up your great Silhouette projects!


Tuesday, March 6, 2012

Bunny Silhouettes WYLTC


This month we are hosting Wood You Like To Craft
and of course we had to do something Easter/Spring related!
We drew our inspiration from some fun 
weather vane type accessories we've seen from Target and Pottery Barn.
We found this great rabbit graphic from The Graphics Fairy.
It was the perfect shape for what we had in mind.
We blew it up to be about 21" wide
and cut it out of 1" pine.
We then gathered our other supplies:
1 7" section of 3/8" dowel
1 chunky table leg from Home Depot
1 cedar fence cap
1 2 3/4" square cut from 1" pine scraps
You can really use anything to build up your base.
Candace used some scraps from her garage and
a ball finial from her son's bunk beds~it's been used
as a weapon being thrown around for a while
so she figured this was a better use for it!;)
After drilling the holes into the bunny and the table leg,
we glued everything together with Gorilla wood glue.
Once dry we stained everything with a coat of stain.
I used Min wax Dark Mahogany Wood Stain,
 and Candace used watered down, dark burnt umber acrylic paint.

When it had dried we tried 2 different paint approaches.
I used some cream acrylic paint that was watered down
to a 50/50 consistency, applying a generous coat.
After letting it sit for a few minutes, it was wiped away with paper towel.
This made the grain of the wood pop through and gave the bunny
a nice translucent weathered warm grey look.
Candace applied some furniture wax to her bunny before
she coated it with a thick coat of cream paint.
The wax allowed the brown stain to peek through quite nicely
when she lightly sanded it.

We always love playing around with paint and trying new things out!
Most of all we love playing around with silhouettes!
We're thinking we might have a whole week dedicated to
all things Silhouette.....
We'll see!
Can't wait to see what Krystal, Melinda and Wendy have
coming up in the next few days!

Tuesday, February 7, 2012

February Wood You Like To Craft


Today we are showing how we put together this fun Valentine heart hanger
Krystal from Sassy Sanctuary started yesterday with her inspiration piece and
in the next couple of days you can see what Wendy from Crafty Goodies
and Melinda from Under My Umbrella do!
Make sure to stop by!

Friday, December 23, 2011

Merry Christmas and Barn Wood Hunting!

Last week we went on our first barn wood hunting trip. 
We were looking for the perfect wood to re-create another manger for Christmas gifts.

There's nothing like crafting with old weathered wood.
My father in- law was nice enough to let us scoop up some spare boards off his farm. 
We had to carefully avoid the spooky cobwebs, mildew, old paint, and large rusty nails while hunting.
Good thing our tetanus shots are up to date (he,he) and we wore a hardy pair of work gloves!
Here is my mother in- law's original manger along with some of her quilted poinsettias?  Aren't the poinsettias neat? She is an incredible quilter!
We love this simple manger because it's the perfect size to perch up on our fireplace, and it helps remind us of what the Christmas season is all about.

Here's a peek of the five finished mangers ready to go as gifts for family members!
Have you ever collected or made anything with barn wood? 

Nicole and I would like to wish all of you a 
 MERRY CHRISTMAS
 filled with peace, happiness, family, and friends!!!


Related Posts Plugin for WordPress, Blogger...