Wednesday, April 27, 2011

Blooming Flowers

We have had a cold and rainy Spring this year and the flowers are finally in full bloom. 
 I couldn't resist taking some pictures. I snapped the white magnolia, cherry, and pear blossoms at dusk and the light was perfect.   

   I hope you are taking the time to enjoy the beautiful flowers around you!


Monday, April 25, 2011

Teacher Door Decorations


Somehow I was talked into decorating
4 Doors for Teacher Appreciation Week!
(Susie you are very persuasive *wink*)
But, just because I may be a little crafty
doesn't mean I have a non stop supply
of crafty ideas, especially when it comes
to clever ways to do up a door.
I also thought it would be so easy
to just google and get ideas to do....
but I found there weren't very many ideas out there.
I was so frustrated and wasted so much time just
trying to come up with something
that by the time I got to doing the doors
I wasn't feeling too crafty.

I quickly found out that glue sticks and construction paper
aren't really good together.
That you should always plan for a door to have a handle.
That even if things look straight laid out on the ground
while you are gluing them on, they will look really
crooked when they are hung up.
Oh, and yes, a "g" looks backwards too
when you are gluing it on at midnight.

So, I thought it would be fun to share some of the fun doors
that were done at our school!
Here's a few that were already up when I went
to hang up mine.
Didn't they turn out great!!!
This is the one I did for my daughter's teacher.
They have been reading Charlotte's Web
and I just couldn't resist!
I cannot begin to explain the appreciation
I have for this good teacher of hers.
I have been able to volunteer a lot this year
and I have loved every minute!
What a debt we owe to our teachers!
So thank you Mrs. Burris!
You are indeed "Some Teacher"!

We hope you all had a wonderful Easter Holiday!
We had a fun potluck family dinner
and I made chocolate dipped strawberries
for the first time.
I was amazed at how quickly they disappeared!
It was great and we came home stuffed and content.
Is there any better feeling?:)
Friday, April 22, 2011

Sunburst Mirror Embellished


One project crossed off the list for the Master Bedroom Makeover
 Autumn from Design Dump designed my bedroom and she suggested making a knock-off of an expensive sunburst mirror.


We were going to start from scratch, but a few weeks ago, I came across a plain jane sunburst mirror in Craft Warehouse for around 50 dollars.  I caved in and bought it because it was metal...and would not fall apart.  Very important- if that thing is going to be hanging above our heads while we sleep!  I knew that with a little embellishing this mirror could be fantastic!

Except one problem that I did not notice until it was time to start gluing. I must have looked at this mirror a hundred times and never noticed one of the spindles was missing! It looks like it was never welded on.

Oops! The mirror was on closeout, so I knew there were probably no more.  So I started hunting the house down for anything metal and spindle-ish.  I found an old antenna, and with my metal snips and several applications of E6000 glue, I stuck it on! :)

  That glue is SO great!

Hopefully nobody will notice.  :)

To embellish the mirror, I found Rhinestone stickers 40 percent off at Michaels,
 and for the ends I rummaged my craft bead bin. I attached each one permanently with E6000 glue.

I picked up about 80 small circular mirrors at the craft store.  The sunburst mirror already had metal plates perfect for placing the mirrors onto.  I did add about 30 more mirrors, using just the glue. I think mine went on straighter than the factory made plates!

In the sneak peek post, I hinted that I was using stained glass materials for the mirror.  Nicole gave me a clever idea to frame each tiny mirror using copper foil and solder, to look more like the inspiration picture.  Nicole has experience with making stained glass. (I am the proud owner of a few of her pieces.) The plan was to wrap each mirror with adhesive copper foil tape and then solder each mirror. 

After wrapping eighty and trying to solder just one mirror....I thought it would be perfectly fine to just use the copper tape as the frame.  I know Nicole would help me with about anything, but it might be asking too much to have her solder 80 + mirrors for me! 

The copper tape was fairly easy to work with and stays put.  After the gold spray paint was added, 
 I think it gives the illusion of being soldered. (At least that's what I'm telling myself!)

To minimize spray paint over spray, I tried my best to cover the large mirror and added several circle stickers over each tiny mirror. The clean up was much easier! 
(My boys thought the mirror was much cooler with the colorful circles.) 

I sprayed the mirror with Rust-Oleum Advanced Formula pure gold spray paint.  It's in the same can as the ORB paint that I love so much.  It sprayed so evenly with great coverage, in fact.. I didn't even prime it!


This was a creative fix for a bland mirror.  Autumn intends for me to hang the mirror by chain over several panels of curtains. ( I have a large window above my bed.)  How cool is that?  I hung it temporarily in my family room and I love it....I may even be tempted to find another one to embellish because I love it so much!

We've been thinking of adding new lighting to go along with the mirror and have been checking out Kichler Lighting.  They have some gorgeous options that would fit perfect with this room!

Stay tuned for many more projects! :)

Wednesday, April 13, 2011

Chocolate Mold Easter Bunnies Using Sculptamold

We are so excited that AMACO (American Art Clay Company) contacted us about using some of their product. They provide supplies for pottery, education, and crafts. We knew exactly what we wanted to make after taking a peek at their website. Last year we won a papier mache rabbit from Anne at Get Your Martha On (Her website is no longer available but our tutorial gives all her great tips!) She made the most fabulous papier mache rabbits. We absolutely loved and were inspired by the rabbit given to us- and of course it made us curious of how you go about making them. Anne gives a fantastic tutorial on her blog explaining how to make papier mache rabbits from chocolate molds.  It is quite a process and definitely worth following her tutorial for a perfect turn out. 

  Instead of  using papier mache in the chocolate molds, AMACO recommended and sent us a package of Sculptamold. It is a dry, white, non-toxic modeling material that produces objects that are very lightweight, strong and durable. Sculptamold combines the best features of clay, plaster, and papier mache, it does not shrink, and is durable for dioramas, 3-D sculptures, model railroad scenery and stage scenery.

Very cool stuff! I know Sculptamold would come in very handy with all the art projects our kids make for school. We are very impressed with this product- from the durability to the set time, we highly recommend it!

We have been making rabbits using the Sculptamold for several days now, and it is quite a process with the setting, drying, and finishing time.  They are so fun to make and we absolutely love how our "chocolate" painted bunnies turned out.  They look so real, that I have had to hold back my kids from nibbling on them! :)
The best part is...they are durable!

We love, love these bunnies with a silver antiqued finish.

For the rabbit above, we painted and added clear glitter. (Pretty much like some of Anne's rabbits.)


We started by ordering chocolate bunny molds from the Custom Chocolate Shop
 Fantastic prices and quite a selection. We ordered carrots and egg molds too...we couldn't resist!

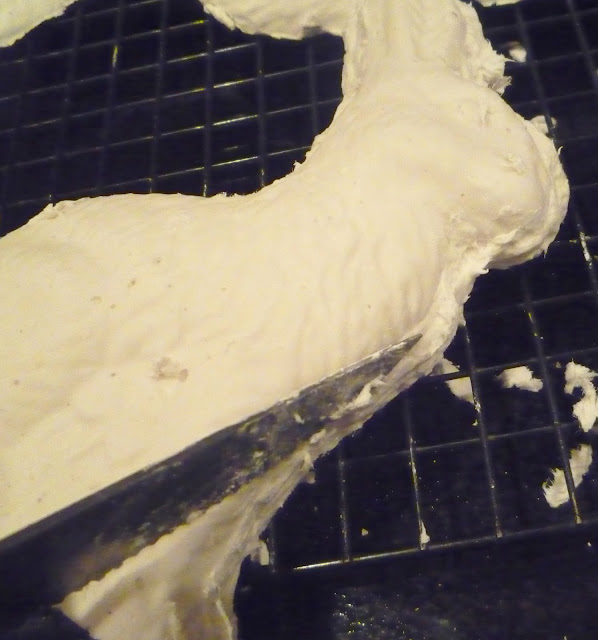
To fill molds using AMACO's Sculptamold, you mix equal parts Sculptamold and water.  Mix for several minutes, partially fill the mold. Tap firmly or vibrate to make sure all detail cavities are filled.  Fill  the mold completely and tap firmly again to remove air bubbles.  Use a moistened knife to smooth the exposed Sculptamold as it sets.  After 30 to 45 minutes or when firm, gently remove object from mold and place on drying rack.  Smooth or fill any defects.  Allow time for cast piece to dry, making sure air circulated over and around entire piece.  Curing time is several days.  To reduce drying or curing time, you can place objects in an oven for several hours at 200 degrees.

This is where we will highly encourage to follow you to Anne's tutorial for perfect papier mache rabbits....because we failed to thoroughly read the directions.  I guess you were suppose to attach the rabbits before letting all the papier mache set. We thought that you attached after! :)

Since we didn't do this, we had to improvise. We definitely were not going to waste all the set rabbits.  To stick them together we made up a small amount of Sculptamold and stuck the halves together.  We filled the cracks with Plaster Patch or spackling....probably incorrect...but it worked and it sands nicely and it also fills in any imperfections. :)  I'm sure with the right mix you could do the same thing with the Sculptamold.


After the patching plaster was fully dry, we carved away the excess, and sanded the rabbit down.

A drywall sanding block worked great and was easy to handle. 

We painted the chocolate bunnies the perfect shade of  chocolate brown with craft paint. We sure do know the perfect color of chocolate alright...we curse all those Cadbury eggs available right now!
To give them a chocolate waxy look, we rubbed on furniture wax.  They look so real in person with the wax!

The silver rabbits got a coat of metallic silver spray paint.

I love this paint and the shiny finish.  Definitely the easy way to paint!

To antique them, we wiped on black glaze to soften the shine.

We added an organza cream bow to dress them up.

For the pastel rabbit, we painted it with craft paint and glazed with light, light, brown to pull out the cracks and crevices.  Then using glue, we added clear cheap glitter.  The painting was the easy part. Using Sculptamold and chocolate molds was definitely a learning experience and very fun.  You all should try it!

If you also want to try Sculptamold, you can find it at Amaco's website
 They have a wonderful website with many ideas for teachers, artists, and more! 

Friday, April 8, 2011

Wooden Easter Bunnies

Yup, more Easter Bunnies!
If you missed our tutorial over at Sassy Sanctuary
we thought we'd share it with you!
We are so excited to join in this month making Krystal's cute Easter craft!
It's so much fun creating with Wood You Like To Craft and we enjoy seeing all the projects!

We "chunkified" Krystal's version using 5 and 9 inch unfinished table legs, instead of candlesticks.
We like our rabbits voluptuous. (hee,hee)
 Then we added large wooden eggs from the craft store. 
We used felt with a little craft paint to make rabbit ears. We cut two pieces of felt for each ear and added wire in the middle using hot glue, so we can bend them as we please. 
 We added a little farm gear to our Mr. and Mrs. Bunny,
complete with vegetables, pots, miniature seed packets, and hats to top them off!  
Our rabbits needed some aprons to hold all of their supplies, so we sewed two aprons made of cotton canvas fabric. We finished the girl bunny apron off with a pink ruffle.
We also added a few pieces of reindeer moss to the hats and pockets.
We found all of the miniature items at Hobby Lobby in their dollhouse section.  
We loved the pearls on Krystal's rabbit so we of course had to add them to our lady rabbit farmer...to make her a "fancy" farmer. :)
There you go, our farmer rabbits! 
 Thanks Krystal for having us and passing along the great idea!

This weekend my little girl is putting together her very own set.
We can't wait to see what everyone puts together
so make sure you link up those projects!

Related Posts Plugin for WordPress, Blogger...