Showing posts with label decorating. Show all posts

Tuesday, September 11, 2012

Burlap Message Board (Ballard Designs Knock-Off)


The kids are back in school and the paperwork is flooding in.  I have four in school this year and I'm afraid I might be buried alive in paper!  I found a cute wire basket at TJ Maxx to help cut the paper clutter,  it is somewhat similar to wire baskets that I spotted in the Ballard Designs Catalog.  I only wish it had one more basket!

While I was peeking through the catalog, I thought a Burlap Message Board would be great to go along with the new baskets.  (A knock-off, of course.)  I love a good knock-off challenge, it makes me happy to make something nice for less.
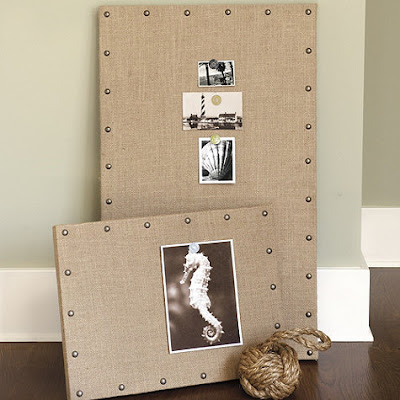


I was lucky enough to spot some great burlap in Home Fabrics last week that is almost identical to what is on Ballard's boards.  The burlap is thick and sturdy with a nice weave.  Perfect for a cork board.  I didn't know there were so many varieties of burlap beyond a potato sack!


I put the Message board in my kitchen area, where the clutter tends to pile up.  I wanted the entire under cabinet area filled with cork board, so I started by building a custom size wood frame.


Here are the supplies I used:

pine 1x2's
Foam Board (Hobby Lobby)
Cork Roll (Hobby Lobby w/coupon)
Burlap
Glue
wood screws
upholstery nails

tools:

staple gun
screw driver
drill
saw to cut 1x2's
rubber mallet


One of the reasons I like the wood frame so much is that I could "frame" around my phone jack and electrical outlets.  I built the frame deep enough to allow the cords to fit behind.  


After measuring my space, I started with the wood frame.  I made a rectangle with 1x2's and braced the center with two more 1x2's.  The braces are important to support the foam board and cork.  I used long screws and wood glue to attach everything, making sure to pre-drill to avoid split wood.

Next, I glued the foam board (cut to size with a box knife) to the wood frame with wood glue.  For extra hold I attached the foam board with staples.  Then I cut the cork roll to fit the frame and used spray adhesive to attach the cork to the foam board.  I then cut the burlap fabric to fit and stapled it to the back.  The corners are tricky, I folded mine on the top and bottom where I knew they would not be seen.
There's nothing worse to me than crooked nail head, it can ruin all of your hard work.  I made an "easy to follow" template to help me get the nail head on nice and straight.  First, I marked how far in I wanted the nail head. (About 1 inch.) I drew lines on each side of the paper one inch in. My nail head is about 4 inches apart (this depends on the measurement of your board) and marked dots on the line where the nail will go. 

Next, I cut a line on the paper with scissors on each nail mark.  Then I lined my template up on the corner of the board, pushed the nails in part way on the dots, then pulled the paper away.  It's super easy, then I moved on down the board with the template.  Before permanently hammering the nails in, I used my straight edge to double check that the nails were straight.  I finished hammering the nails in with a rubber mallet to avoid damaging the nails.

I used sawtooth picture hangers to hang the board on the wall. The open frame and foam board keep the board light!

Now I have a burlap message board that rivals a high ticket board from Ballard Designs for a fraction of the cost!  I am one happy and "semi-organized" gal!  


Monday, December 6, 2010

Peppermint Wreath

I love the peppermint decor this year.  I was strolling through Home Depot and found Martha Stewart's candy cane line.  I picked up a box of over sized candy canes and thought they would make a fun wreath. 
I used a fresh wreath from Costco, MS candy canes, peppermint picks and berries from Hobby Lobby. For the ornaments, sadly...I plucked them off of my "broken" ornament wreath from last year.  I loved that thing...darn it! I didn't put it in a safe spot, and it was smashed to the ground. At least I salvaged some ornaments from it? 
I wired all the candy canes and ornament balls on- to hold up in the cold weather- and hot glued all the picks.
It makes me happy! :)
I wanted to make it fun for the kids outside.  My boys don't get too excited over all the fancy Christmas decorations...


Sharing with,
&

Thursday, December 2, 2010

It's Christmas Mantel Time!

FRESH vs. FAKE
I couldn't decide which to use so I used both!
They make my home smell great and I was able to use a cheap lit-up garland I had on hand with a fresh cedar garland and I was very happy with the results!
(Eddie Ross gave this great tip of mixing greenery here)
The fake garland makes a great backdrop filler for the fresh garland.
You gotta love those Costco wreaths! 
Not only are they pretty inexpensive but they are gorgeous!
I added some glitter and paint to the pine cones and berries and wove in a few fake boxwood sprigs here and there around the silver glass candlesticks and ornaments from Target.
 **Note to self...do not use glass ornaments next time.  The fireplace is not shatterproof!**
 Running short of the fresh greenery...I grabbed some from my backyard...there's a bunch and it's free!
Remember all those mismatched frames from the Model Home furnishing sale?
  Can you believe this was in the unwanted/almost free section!? 
I don't think anyone could get past the urn pictures. 
After a quick trip to a glass shop I now have a new mirror. 
I was really happy with how it turned out plus it was much less than buying a new mirror of that size. 
Hanging that mirror was so hard!  It is definitely a two person job.
  I hope my husband doesn't peek behind there and see a dozen holes in the wall....oops!:)
I gotta keep moving on....I still have to put the tree up!
Nicole and I have a couple of fun Christmas projects to share soon...yay the two of us!
If only there were more hours in the day!

Sharing the mantel over at The Lettered Cottage....better late than never! :)
The Lettered Cottage

Wednesday, April 28, 2010

A Mirror For My Mantle?


I have always wanted to join in Beth's Vignette linky party at The Stories of A to Z.
I thought I would try decorating my mantle.
I have been stumped with decorating my fireplace, it is heavy and rustic with the stone and I have trouble balancing the decor.

This is my favorite tree!  It is in full bloom right now.

 I look forward to this tree blooming each year, in the fall it turns a dark red.
 I decided to cut some of the branches and bring them indoor.
The blossoms are so fragrant.

This is the mirror I had some problems with a few weeks ago.  The plan was to enlarge it to fit the wide space above my mantle. I mounted the mirror onto a backboard with tons of liquid nails and started drilling  screws into the frame. I quickly realized that the frame is made from a cheap material and is HOLLOW!  There went that idea!


This is how it looked above the fireplace in it's original black. 
 I didn't really like it and I couldn't return it with a goopy glue all over it.
 So I took Nicole's advice to spray paint it.  She said to first mist with silver and then mist with gold...back and forth. 


The rain sprinkled on it while I was waiting for it to dry...oops!  I decided to give it an aged look! :)
I rubbed a few of the edges and lightly wiped on a black glaze.

What do you think?
Should I keep looking for a larger mirror or go for something entirely different?


Related Posts Plugin for WordPress, Blogger...