Monday, November 28, 2011

And The Winner Is!!!


So the lucky winner
of this fabulous Scentsy giveaway
courtesy of Dawn Simpson
our favorite Scentsy gal is.....

comment #32
annemarie
Congratulations!!!!

Thanks to everyone who joined in!
We loved hearing about the scents you love
and consequently our  list of what we  want is getting longer!
Thanks Dawn for your generosity!
Don't forget to go visit her site for all your Scentsy needs!

Monday, November 21, 2011

Scentsy Giveaway!


We thought this giveaway would be
PERFECT
for this week as everyone is getting ready for
the Holidays and all the company the season brings.
We have become seriously addicted to Scentsy products
and it doesn't hurt that they are made right here
in the town we live!
Just ask our family what they got for Christmas last year!:)
Our good friend Dawn is not only the kindest and sweetest gal
and mom to 3 adorable kids with another on the way
but she also just started up as a Scentsy Consultant
and was kind enough to offer this wonderful
giveaway for one of our lucky followers!

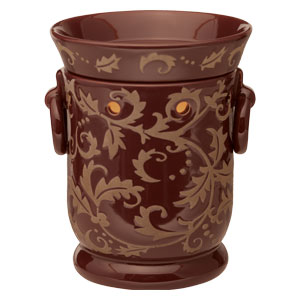
Dawn is offering this November's warmer of the month
PLUM GARLAND
and a bar of the scent of the month too!
MIDNIGHT FIG!
The Giveaway is going to run until Saturday night when we'll pick our winner!
So here's your options to enter!

1. Leave us a comment with your name and an email
to contact you back if you win!

2. Tell us what your favorite scent is!

3.Follow us on Crafty Sisters!

4. Follow us on Facebook!

That's 4 chances to enter!
Make sure to check out Dawn's Scentsy web page
where you can easily order your Scentsy
and have it shipped directly to you!
If you have any questions or would like to
host a party and smell all those fun scents
Dawn is your gal!

We are excited to see what scents you guys like!
Some of our favorites are:
Camu Camu
Hazelnut Latte
Blueberry Cheesecake
& Pumpkin Roll

Happy Sweet Smelling Holidays to you
and make sure you enter to win!!!


Thursday, November 17, 2011

Family Picture Block-WYLTC?

Hey everyone!
  We are over at Wood You Like To Craft? today!
This month's theme is FAMILY.
Come see our family letter picture holder we made. 
Are you looking for homemade family inspired gifts for the Holidays?
Here are some ideas that you won't want to miss!

wood you like to craft?

Monday, November 14, 2011

Guest Posting at Tattered & Inked

 
We are guest posting over at
today! 
 Come check it out!
I got a little distracted from the room projects making Christmas banners and a pueblo for my son's class. 
He looks happy about it, doesn't he? 
We made his pueblo out of Capri Sun boxes, and slathered it with Sculptamold
 Awesome modeling compound, by the way.  It sticks to about everything and dries quickly. 
My hot glue gun and reindeer moss came in pretty handy too!

I had a problem with the faux roman shades yesterday,
 but after a trip to the window treatment center in JC Penney, I think I'm back on track!
Hopefully I will have those shades up and hanging by tonight!
See you soon!

Saturday, November 12, 2011

For The Birds...

Okay, I revamped the bird artwork I was working on yesterday.  Who knew what I thought would be the easiest project on the list for the bedroom, would turn out to be the most time consuming! 
I am still in the process of gold leafing the frames, so these pictures are only with mats. I have never gold leafed anything before. In the beginning, I was so worried about handling the fragile gold sheets. Then I became a little more confident, and whipped right through 3 frames.  Now I'm wondering what else can I gold leaf? Hmmmmm.
Autumn thought I could knock-off the Ballard Design bird pictures for the room, except add gold leafing to existing frames.  Much, much trickier than it looks. One wrong slip with the scissors and you have a weird looking beak and bird! :) 
 I did bookmark this Ballard Design knock-off  by Lindy from Cottage Hill, when I saw it on Knock-Off Decor several months back.  It was a life saver and she did such a great job with her birds.  I can REALLY appreciate it now! Lindy also shares a printable if any of you want to try this. No ugly beaks if you use her copy.  I started tweaking mine a little...and got off course!

 I'll be back on Monday to share more projects for the room, and a better picture of the birds with frames. 
  I need a day of rest...and  I also get to help my son build a pueblo diorama due Monday! 
 Such procrastination! :)

Friday, November 11, 2011

Just a Glimpse

I wasn't digging the artwork I made today,
 so there will be no project to share. 
Instead- here's a small glimpse of the roman shades I have been working on.
  Autumn suggested making them from IKEA curtain panels. 
Here's my super kind sister, Nicole, spraying the bedside IKEA dressers. 
I can't wait to share the finished results.

Now, I need to get back to work and figure out what I'm going to put in those frames!
See you soon!

Thursday, November 10, 2011

Simple Plant Stand

 
I'm back again....I think I'm setting a record for daily posts here at Crafty Sisters! I am making a lot of progress. I should set more deadlines like this for myself and tell everyone about it. 
Just think of all the things I would get done! :) 
 Autumn drew up in the design plans, a tall and skinny plant stand for the corner of my bedroom.  I have been looking around for months and have had no luck finding the right fit.  They were either too short, or too busy. So, I decided to build a stand myself, and save some money too!
I used a 10 inch piece of mdf for the top, mitered chair moulding to wrap the edges, 2x2's for the legs, and 1x2's to brace the legs at the bottom. The shelf is about 40 inches tall. I added the chair railing just like we did for the Ballard Shelves. I still love those shelves, they were the first project we made here at Crafty Sisters.

I attached the legs with long screws and added Gorilla Wood Glue. Next, I glued and nailed the chair moulding onto the top. I couldn't figure out what I wanted to do with the bottom, so I added 1x2's. Finished it off with a little...okay...A LOT of wood filler and paint. Did you see those holes!?  
.  I topped it with a Jade plant and pretty pot, and there you go!  A very easy, not so fancy, plant stand.
I hope I keep it alive...I don't have the best history with live plants! :)

Wednesday, November 9, 2011

Pillow Shams

Hi there!  I'm back again sharing another finished project for the bedroom
 Autumn designed shams to go along with the bedskirt .   
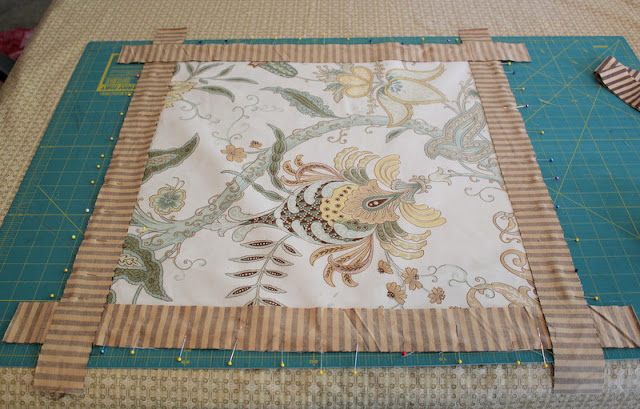
Autumn wanted me to add the same striped material that we used on the bedskirt to the pillow shams. 
Each sham fits a 20x20 inch pillow insert. Did you know that IKEA has really cheap prices on down pillows?  I believe they were around 5-10 dollars each! 
I cut 2 inch strips of the striped fabric to create a trim around each pillow. The idea was to miter each corner.  Let me just say that it is very difficult to sew and miter stripes. It was above my sewing level,
 so this one went straight to Mom!  My mother is a saint!
She patiently hand stitched everything. Crazy..I know! If we had to do this again, we would have created a trim with the striped fabric first and then sewn it to the pillow. Oh well, we learned something new! 
Today, I made this.  It's my attempt at a plant stand.  I couldn't find a tall plant stand that I liked anywhere, so I decided to build one.  I haven't figured out the bottom yet, so come back tomorrow to see how it turned out!

Tuesday, November 8, 2011

Reupholstered Benches


Moving forward to the next project for the master bedroom,
a pair of benches that sit at the foot of the bed.  I found these lovelies at Target. 
 They were fine as is, but it was fun to add some color and give them a unique look!
You can tell how long I have been sitting on this project by the color of the grass.
  I miss my pretty green grass!
Autumn from Design Dump picked out the fabric and the trim, and I purchased it online. 
 I would have never thought to put the two together, they look great together!
The ottomans that Autumn originally picked out were from Sears, I think you can still buy them online. 
They had more of a "box" look, so I definitely needed to add some more foam to my Target benches. 
To avoid wasting the original foam, I added layers of foam I had on hand. 
If I were to do it again, I would probably just use one thick piece of high-density foam. 
The look would have been much smoother, but hey, it was free!
When it came to upholstering, I wanted a clean look with sewn corners to create the "box" look.
 I flipped the fabric over, like you do when you make a slipcover, and pinned. 
Next, I used my quilting ruler to get the correct angle, and marked the fabric before sewing. 
I love the sewn look, and it was really easy!

 I finished it off with staples.  I have been using a power stapler with too thick of staples for years.  It was always a difficult chore to upholster, and I wasn't ready to take the step to an air powered stapler. I went to Home Depot and bought a semi-heavy duty stapler for 9.88.  The staples went in so easily!  Not bad for under 10.00. 
I finished off the ottomans by adding trim with a glue gun.
I am really pleased with how they turned out. This project gives me an itch to try some more upholstery. 
 It was so fun to take a piece of boring furniture and give it a little character!
Today I started the headboard! Yeah!
 It is a knock off of a headboard from Ballard Designs, and one of the more hefty projects left.
  I'll be back tomorrow with another project crossed of the list!


Monday, November 7, 2011

Fun Prints and a Bedroom Update


I know it's been a really, really, long time since I have shared any updates on the master bedroom makeover.  I have been working on it slowly, but surely.  Summer with the kids home, an appendectomy that took me out for a couple of months, and I get so easily distracted with crafting. :-)  Life is also busy with four boys! No more excuses, I am determined to finish this room, so I'm giving myself a deadline. Hopefully in one week I will pull this all together. I have a new found respect for the all the people that put together rooms and make it look so good in photos. 

Nicole is permanently tied to her saw, the boutique she is involved starts at the end of this week.  So, while she's busy, I am going to share with you several of the projects we have been working on. I say "we" because Nicole is always so nice to help me out!

For any of you that are new, I had Nicole's sister-in-law Autumn, from Design Dump, design my bedroom on a budget.  Most of the projects are diy to help me save some money. Here's what we have done so far:

an embellished sunburst mirror

a custom tailored bed skirt


ikea curtains with added trim 

wall-to-wall curtain rod made with conduit pipe.

Here is the project for today-
Autumn found these fun prints on Etsy.  They are from Plum Street Prints, and I love them!
They represent the states that my husband and I grew up in. 


  You buy the prints, download, and then print. Simple! I accidentally printed them incorrectly, and Plum Street Prints was nice enough to help me solve the problem.  The key is to print on white card stock or matte paper and use the right printer.  The second time around I used Staples...I think I'm forming an addiction to their printing service...so cheap and easy! I originally printed somewhere else and on the wrong type of paper, so the color was not accurate to what the original was. They quickly helped me solve the problem and even custom colored two prints to match my paint colors. Thanks Plum Street!

The green WA is the original print I purchased and the blue ID is the custom colored.

In the room, I took away the original green, and added in the custom colored WA in with the custom colored ID.  Which one do you like? It is really hard to take a picture in the room with an accurate color.

I will be back tomorrow to share another project, and hopefully every day this week until I finish!
Wish me luck! :)
Related Posts Plugin for WordPress, Blogger...