Monday, February 28, 2011

Black & White Photo Party

It's time again for Tracy's Trinkets and Treasures Photo Linky Party.  I am really enjoying playing along!  The theme for the week is black and white. Tracy encouraged everyone to shoot in color, later changing the photo to black and white in your photo editing.
Tracy mentioned looking for texture.  What better than bark on trees? :)
I wandered out to my back yard again, shooting some close ups of the trees. 
It's amazing to see all the texture that comes to life when you switch it to black and white.
 The picture above is of  a River Clump Birch tree.  I love the papery, peeling look of the bark.

I found this little pile of decaying plants. It has so many textures,
 from the leaf skeleton to the moss.  Very cool in black & white. 

I'm going to have to venture out of my yard for the next party. :) 
If you look hard enough ~ it's funny how you can find beauty in such simple things!

Thanks again Tracy! 


A Winner And A Ryah Sofia Giveaway!

Here's the results from our Party Hat Banner Giveaway!
Using Random.org we chose our winner,
(yeah, we still don't know how to post a picture of that thing!)
#27 ~ tsgsusans
Congratulations!
Thanks for all the sweet and fun comments!
We love getting feedback from you!
We are excited to offer one more giveaway!
 Boy, we are full of giveaways this week! 

The headbands from Ryah Sofia are so adorable and we knew
 our readers would love them too! 
"Ryah Sofia sells handmade headband's and clips for everyday wear. We sell a variety of colorful and unique headbands that can be worn any day and every day. We recently started our clothing label ~ MoMo- handmade clothing for everyday wear ~ where we currently have matching Tie and headband sets. We use only the best fabrics and ribbon and all of our products are made in the USA!" 
How cute is that baby?  We love that all the appliques come attached to a snap clip,
which makes them inter-changeable with any of the headbands or worn alone as a clip.
Plus a portion of Ryah Sofia's proceeds benefit Nana's Box
~ a non profit project dedicated to fighting cancer one box at a time.  
How cool is that!
Angie from Ryah Sofia would love to give one of our readers
the "Jeannette" applique from her spring line,
along with 2 headbands- one in black elastic and one in black metal.
Here's what you need to do to enter...  

*Go take a peek at Ryah Sofia's website. Pick your favorite item and leave a comment here about that item (one entry).

*"Like" Ryah Sofia's facebook page (one entry).

*Spread the word about this Ryah Sofia's giveaway on your blog, facebook or twitter (one entry).

 That's three chances you have at winning this adorable giveaway!
Leave a separate comment letting us know each way you entered!

(The giveaway will end Saturday, March 5th).
Good luck!!!!

Thursday, February 24, 2011

WOOD You Like To CRAFT?!

Calling all Wood Crafters!! 
If you guys love wood crafts as much as we do
you're gonna love this!
Have you been looking for a craft group to join?
Well there's a new craft group in town...well, here in blogland
and we are so excited to be a part of it.
We "wood" love to have you come and join in!
  It doesn't matter it you have some serious wood skills
or are a beginner, all are welcome!
wood you like to craft?
 http://woodyouliketocraft.blogspot.com/

The craft group will be hosted by
Melinda from Under My Umbrella,
Krystal from Sassy Sanctuary,
 Wendy from Craft Goodies,
and us Crafty Sisters.
 Here's a little more about how it works:

Wood you like to Craft? is a bloggers craft group. We have gathered four fun blogs that have a love for wood crafts. Each month we will be creating one project selected by the "host." Then each of the other bloggers will take a turn showing their variation of the same craft. But we want you to join in too! We will have a week long link party so you can make and share your take on the month's craft. We can't wait to see all the twists and turns one project can take!

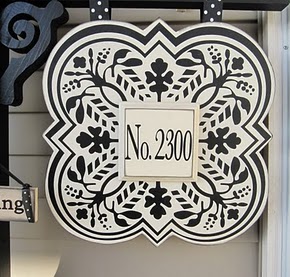
Up first is a sneak peek of a very cool wood plaque
created by Melinda from Under My Umbrella
On March 7th,
 Melinda will share a full tutorial. 
 Don't worry if you don't use power tools,
the cool thing is that you can put your own twist on each project,
link it up and enjoy seeing what everyone does too!
We'll be having some giveaways and a whole lot of fun! 
For a full supply list and more info, visit
 
So head on over, grab a button and spread the word!
We'll see ya March 7th!:)

Wednesday, February 23, 2011

CELEBRATE Giveaway!


Most of you know we hit a
major milestone as far as blogging goes...
When we started we were excited just to know
our Mom read our blog,
and that our Dad was posing as a distressed
housewife leaving comments for us to read.

Brent said...
Wow! Your work is incredible. My wife has two sets of twins and 2-month-old triplets. She would really like to copy your work but sawed off three fingers on her right hand two years ago and needs the other two to take care of our babies. If I had only known how simple these projects appear to be, I would have helped her instead of watch football!

Our Dad is hilarious and has always been our family's comic relief!

We never imagined we would have so many
wonderful supportive friends
that would check in to see what we
were up to and more importantly
to inspire and motivate us.
So we just wanted to "Celebrate" this milestone with you!
K & Company was soooooo kind to send us
some really great scrap booking supplies to work with!
They are so cute we couldn't wait to use them.
So here's our really fun banner that we
are going to giveaway
to one of our Wonderful Followers!

Here's the paper we used:
We instantly fell in love with these party hats!
We cut them out of 1/4" MDF.
We Modge Podged on the cute papers
and made little yo's out of coordinating papers to top off the hats.
We found this ribbon at Hobby Lobby and knew it was a perfect match!


We snatched up the last box over at Michael's of K & Company's Twinkle (gold glitter) chip board letters.
Don't ya just love those circus type fonts?

Each party hat is 5 x 7" wide so when it's all assembled this banner
stretched just under 7 feet across.
Perfect for any celebration!
Seriously, could these papers be any cuter?
So to enter our "CELEBRATE" giveaway
make sure that you are a follower
and leave us a comment.
We'll be thanking our Special Follower
Sunday night,
or Monday morning.....
Thanks again for all your kindness and support!
:)Candace & Nicole


Sunday, February 20, 2011

More Flowers By Candlelight


This week Candace and I have been super busy!
I snuck along with my parents on a quick business trip down to Utah
to see a fabulous Art Exhibit by Carl Bloch, a Danish artist
who is known for his amazing religious oil paintings and etchings from the late 1800's.
Our Mother has been a long-time admirer and collector of his work
and I was glad that my daughter and I got to tag along and admire it too!
It was a wonderful getaway but it also meant there wasn't much crafting done this week.
I was a bit giddy putting together some of these fun singed flowers
like the sunflowers we did this fall.
I've been working on a custom set of letters for one of my clients.
She wanted zebra print with touches of purple for her little girl's room.
I was amazed at how many shades of purple there are out there
but nothing was right for what I had in mind, so.....
I just had to make my own!
The lighting doesn't do them justice, they are the perfect shade of deep purple! 
I was so giddy I had to call my sis and share with her how excited I was!
These suckers are addictive and so easy!

This week we have some fun stuff in store!
We are working on something to "celebrate" (hint, hint...)
that we hit over 1000 followers!
Yikes!!!  Can you believe it?
I hope you all know how much your support
motivates us to create and to follow through with all of our projects!
You are the ultimate support group!:)
I believe this calls for a giveaway!!!
So stay tuned this week and see what we do!


Tuesday, February 15, 2011

Random Post

 I found in Costco this ginormous "Costco Size"cook book with over 1,000 pages of recipes. 
 I have been a fan of Cook's Illustrated and America's Test Kitchen for a little while.
You know the funny guy with the glasses?  Well, he doesn't look so funny in this picture. :)

  After I had my last baby I watched a lot of PBS cooking shows during the midnight feedings.  Maybe I was hungry, but everything they made looked so delicious! I love how they tell the science behind cooking and give you examples of why your meal didn't quite work out right.  I don't know about you, but I can be handed a wonderful recipe and mess it up right away.  Either I over stirred, overcooked, or just flat out messed up the recipe. Maybe it's because I usually have several kids pulling at my ankles while I'm cooking dinner! 
The cook book is not full of pretty pictures, but I love the how-to illustrations. Look how they split a ball of cookie dough to keep it chewy and thick while cooking. Bizarre...but it works!
  I have only tried five recipes so far, but they have turned out great.  
How about you?  Do you like Cook's Illustrated? Have you had any luck with their recipes?

Along with cooking, I am still playing with my new camera
I don't know what the heck I'm doing, but it sure is fun!:)

Tracy's Trinkets and Treasures is having another photo party using Bokeh...or blurry background.
I headed outside to find some signs of spring.  I love spring! I think it's my most favorite season.
The Magnolia bush in our yard is starting to bud.


A bud on a Dogwood shrub.
The last picture is of our Choke Cherry Tree.  The weather has been so beautiful here!
Thanks for letting me share my little photo hobby! :)


In the next couple of weeks we will be starting on a much needed, big project, full of DIY. 
 We'll fill you in on the details soon!


Sunday, February 13, 2011

Last Minute Valentines


My little girl's Valentine party at school was Friday,
and as Room Mom I got to help plan their party.
I have to admit it has been a total guilty pleasure for me
because I have absolutely grown to love
all those sweet kids in her class!
So I made little cherry cheesecake cupcakes
and my favorite Hershey Kiss Peanut Butter cookies,
but what went over the best were these fun Bingo cards I put together
totally last moment.
Really, I was picking them up from Staples where I got them laminated
just 10 minutes before the party started.

I've seen tons of great ideas for Bingo...two of my favorites are over at Eighteen 25 and The Idea Room!
I was ready to print them out and her teacher emailed me all the kid's pictures to use
the day before the party and I just had to use them!
(I didn't post a picture of them because I don't have permission
to show off all those cute kiddos!)
After spending too many hours trying to download, upload and all that
onto some other online bingo card makers,
I found the simplest way was to just collage them
using my favorite freebie program Picasa!
They were super easy and a fun memento for each of the kids to take home.
If you don't have enough pictures to fill the spaces, you can do what I did
and find a fun picture of the school mascot.
It worked out great and the kids loved it!

Here's one I did up for our family to play tomorrow night for family night!
We didn't make squirrel Valentines either...yes, shocker....
and we don't have 4 cats, 2 have met their maker
but we needed the numbers for bingo purposes!:)
You have to improvise when you only have 1 kid.
and took it and ran with it.
I cut out everything on my cricut and we glued as fast as we could!
My little girl thought it was so fun!

Pheeewwwww!
Now I get to actually enjoy this holiday knowing all the hard work is done!
My hubby has made his famous Valentine's Day Lasagna
that he makes every year for me.
Just knowing that I don't have to cook
makes me feel loved!
Happy Valentine's Day!

Friday, February 11, 2011

Plaster Hearts


I started playing around with plaster last week, and I totally blame it on the dogs.
 I was in Marshalls with my 4 year old son and we discovered these "Cast & Paint" dogs in the toy clearance. I have not used plaster before but we had so much fun pouring the molds and then painting. 
 The kit came with a strip of magnet to make the dogs into magnets.

A couple of days later I found myself bringing home a gigantic box of Art Plaster! I started filling some of the leftover heart lollipop molds and a couple of candy molds from our mom. I also went looking for the silicone heart molds but didn't have any luck finding any for cheap.  I started experimenting with some cookie cutters and found that if you have the right consistency, you can pour it into just about anything as long as you can push it out after it has set.
I used a stain glass cookie cutter to make these glittery cookies.

The easiest way to pour and mix plaster is with a Ziploc bag.  Mix the plaster until you get the consistency of pancake batter.  Cut the end off, and pour away!

In this picture I backed the cookie cutters with plastic lids.
I found these little hearts that snap in two and drilled a hole to fill with plaster. 
 It would have been much easier with the silicone trays, but hey...I "improvised"! :)
After the plaster sets, it is not fully dry and you can carve it. This helps if you have made any mistakes when you poured. If you want to hang any of your creations, add a wire loop before it sets. 

To dry the plaster quickly, you can microwave on the lowest setting for 30 seconds at a time.  
(Just don't put the heart with the METAL wire in the microwave) ;)  
 I gave them all a light sanding to smooth out imperfection when they were fully dry. 
I used Liquid Nails heavy duty adhesive to glue the cookies together...I know, what!?  You mean, none of you have glass glittered with Liquid Nails before? :) The consistency of the glue was perfect to stick them together like frosting, and the glitter actually stuck! So, they're TOXIC cookies...full of Liquid Nails and Glass Glitter, but they sure do look cute! :) This might not be a project for the kiddos. I know Melinda over at Under My Polka Dot Umbrella made some wood cookies and used spackling as the frosting. I think glitter glue might work too?
I touched up the edges with regular glue and added more glass glitter from Meyer Imports.
LOVE that stuff! 
Here are the hearts from the "improvised" candy molds.  Little tiny sweetheart candies!
I had so many hearts that I had to figure out something fun to make with them.  No surprise...I made them into magnets, using the leftover magnet strip that came with the plaster dog kit. I thought they would be cute painted and strung together into a heart pennant banner.
How about you? Have any of you played with or created something fantastic with plaster?
Plaster is a fun project to involve your kids in, they really enjoyed it!
(Just keep the Liquid Nails away from them!)  :)
Related Posts Plugin for WordPress, Blogger...