Tuesday, December 28, 2010

Snowflakes

We hope you all had a wonderful Christmas! 
We truly enjoy this time of year even with all the busy that comes with it and
thoroughly enjoyed spending time with our families.
Of course we still found a little bit of time to craft too!
We loved all the possibilities of what we could do with the

We got some great use out of it!
We were pretty happy that it was so kid friendly so we put the kids to work.
Although we know that all the die-cut machines are pretty glorious, the Cricut has endless projects....there's something about putting your hands on a punch and snipping out pieces that's really fun, plus little hands can join in the fun.  I know in the past we have given a tiny circle punch to our kids and they played for hours punching out colorful circles!
It's a perfect way to use all of those paper scraps you might have!!!

Here's a couple of projects we made using the Snowflake punch:
A snowflake garland that will last you through the winter blues!
  Using paper scraps, we sewed with a sewing machine all of the individual snowflake cut-outs. 
I can't remember for the life of me who started doing this on the blogs, but we love it. 
So easy, your done in a matter of minutes!
Embellish your wrapping! We added dots of glitter glue for fun!
We made a candle luminary.  We backed ours with vellum and loved the effect!
We used the snowflake die-cut to decorate wood crafts. 
We made these a couple of weeks ago while playing around with glitter.
 Adding glitter to the snowflake makes it come alive!
We embellished this package with one snowflake
cut from glitter paper and another we used spray adhesive
and added glass glitter with a rhinestone. 
If you try this, give it a good shake to get the excess glitter off.
Because, we wouldn't want any glitter in these yummy truffles! 
 We'll be back soon to share Mom and Nicole's truffle making. 
They are a great idea for upcoming Valentines!
They were so delicious!

What would you do with a Snowflake Punch?

Saturday, December 25, 2010

Merry Christmas!


Merry Christmas!

Thursday, December 16, 2010

Ruldoph the Red Nosed Root Beer!

When our kids were in preschool together, one of the moms used to bring the most adorable gifts to all the classmates.  For Christmas she brought root beer reindeer and we almost died with the cuteness! 
She used IBC root beer bottles , they make the perfect body for a reindeer.  Perfect to give one root beer as a gift, or a pack to friends and neighbors.  Who doesn't love root beer...well maybe some of you? We have also seen this done many times with other types of soda bottles. 

Here's what you need and a little tip of how to make the antlers.  Why you ask.... would you need a tutorial for pipe cleaner antlers?  I thought I didn't need one and took them to boy scouts for a craft project.  Well, the antlers ended up looking like this.....
Cute, but could be better.  Nicole came and worked her cute magic on the antlers and I thought they were perfect.
You will need a bottle of IBC root beer, ribbon, two googly eyes, and any size of red pom-pom.  We went with the BIG size with sparkles, and I kinda think he looks like Beaker from the Muppets!
We also used red pipe cleaners, the preschool mom used brown on hers. Whatever you prefer.
We used hot glue to attach everything.
Who wouldn't want this as a gift? :) 

Wednesday, December 15, 2010

K & Company Vintage Paper Ornaments

We were absolutely thrilled when we were sent a package
of crafting goodies from  EK Sucess Brands/ K & Company
They have the cutest Christmas line by Susan Winget -Glad Tidings 
that is a classy vintage style with gorgeous stickers. 
This paper line offers so many ideas and possiblilties we thought we'd start with some ornaments. 
They have the most gorgeous glitter paper
and snowflake punch that made it easy to whip these out.
We  first made some medallion ornaments similar to the glitter ornaments
 we made a few weeks ago. 
This time we made them larger and used chipboard. 
We used the same pattern from the Cricut, but you can actually trace the pattern and hand cut them.
We glued the sheet music and there is one problem with using chipboard. 
It curls. 
That's why we love working with wood.  It's so much more substantial.
We found a solution by pressing it flat with heavy bowls.  
We added a little reindeer found in the Susan Winget Glad Tidings Snowman die-cut pack.  
They have some really fun and festive silhouettes.
After drying, we glued and glittered the edges.
We love that Martha glitter!
Next, we tried making some paper cones. 
For a while now, we have wanted to make some vintage ornaments
and ran across lots of very inspiring ideas.
We found some great tutorials for making cones  and rosettes
Andrea over at the Opulent Cottage gave the best tutorial for rosettes, and cones- a great picture tutorial.  Better Homes and Garden  also has tons of vintage ornament inspiration. 
We used K and Company's Glad Tidings Glitter pack to accent the ornaments.  
 We LOVE this Snowflake punch.....it is a great tool! 
 We punched several snowflakes out of the thick red glitter paper with ease!
Crisp and clean cuts! 


For this ornament, we used extra glittered wood snowflakes for the base, punched snowflake die-cuts, rosettes made out of sheet music, and the super cute stickers.
Here's an upclose picture of these luscious stickers.  In real life, they are very 3D.  The snowglobe stickers even have snow glitter that wiggles around in them.  Love them!


We added a little glitter around the sheet music rosette.

For the Santa sticker, we embellished the ornament with strips of red glitter paper.
Adding glue between each layer.

And last, the oh so cute snowglobe sticker deserved a prime spot on an ornament.
As you can see the possiblities of things to create are pretty much limitless.
Plus it's always fun to work with such great quality products
so you really can't go wrong with whatever you create. 
These also make great tags for gifts and neighbor treat bags!
Happy Ornament Making!

Thanks again K & Company for indulging our crafting habit!!

Saturday, December 11, 2010

This Ain't Your Momma's Gingerbread House!

We are SOOOOO excited to share this fun project!
So how many of you love making gingerbread houses each year
and then cringe when you end up throwing them away
after spending $20 on candy then feeling like your
torturing your kids by wiggling it in their faces with the words
"Don't Touch It!  It's a decoration!"
And when they finally can it's stale, nasty and who knows how much dust has accumulated
or sticky little hands and tongues have already tasted the treats....
(This is Nicole talking....Yes, I have issues....) 
We have been dreaming this one up for a while now,
but have had our hands full with boutique season,
so when we finally got together it was so much fun!! 
At Michaels, we found wooden puzzle dollhouses that looked gingerbreadish to us. 
We're not going to lie...they were a beast to put together with vague directions,
but the results are fantastic! 
So, if you have an hour...or two...to put together this puzzle, we highly recommend them!
Don't forget to use your coupon!
We used fake candies on all of the houses, so they would last year after year. 
We found all the candies at Hobby Lobby. 
They were going fast, so most might be gone this late in the season.
We added bottle brush trees and used lots of Snow-Tex and glitter.
Nicole's gingerbread house was quickly taken over by Little Pet Shops!
Her little girl was in Heaven playing with the houses!
You have to glue these houses together for stability.
Nicole used tacky glue and Candace used a hot glue gun and wood glue.
I love this dollhouse because the back is open, letting little hands play and it also is easy to use lighting.
Spray paint works best!  It's much easier to get into the nooks and crannies of the house.
We found a brown spray paint by Krylon at Hobby Lobby.
We used a knife to add Snow Tex (love that stuff!) to the roof line. 
and our fingers to spread it all over.
We gathered our candies and mini-lights, snipping off the ornament hole and cutting off each light.
To match the sugared candies, we put spray adhesive on each light and added glitter. 
We used hot glue to attach each candy and light.
A set of mini snowmen were added along with mini wreaths.  So cute!
Nicole's daughter quickly moved the pet shops in! Staging them just so in the house.
"This ain't your Momma's Gingerbread House!"
How cute the sleds look on the front porch!
Of course there had to be a Christmas tree for her friends!
  Her daughter picked out beads for ornaments and they glued them to the tree.
Candace gave her house a "minimalist" wreath...hee,hee!:)
We glittered all the trim work with modge podge and glitter.
Candace used some spray can flocking snow on my house and got a little carried away....
Maybe stick with the Snow-Tex.
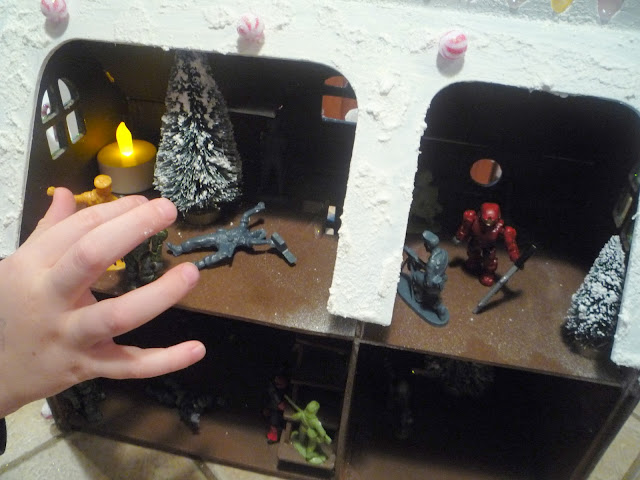
Candace's boys have their own version of playing house.....toy soldiers and Halo guys...
death by the Christmas tree!

We hope you guys like it!
They were a lot of fun to make with the kids and will be enjoyed for years to come!
And hey, they were less than $20 a piece to make too!

Happy House Building!!!
:)Nicole & Candace

UndertheTableandDreaming    Join us Saturdays at tatertotsandjello.com for the weekend wrap up party!
Related Posts Plugin for WordPress, Blogger...