Showing posts with label valentine decorations. Show all posts

Wednesday, February 13, 2013

Love Bugs

Is anyone else scrambling to make Valentines to hand out at school? A couple of weeks ago I found this adorable paper at the craft store and knew that Valentine butterflies were in my future.
The paper is Paper Note by American Crafts. The whole paper line is really fun!
I wanted to attach them to a treat with the clothespins. I was able to put a few treats in a little snack size bag and clip the butterfly on. I've seen several butterfly ideas for snacks around on the Internet and knew these would work perfectly! I cut out several designs of butterflies that were patterned in the paper and glued them onto wooden clothespins. I painted the clothespins in different colors to match the papers and used really thin jewelry wire as antennas that were attached with a dab of hot glue.

The wings are glued to one side of the inside of the clothespin.
To create a bit of movement make sure to bend slightly the top wings up and the bottom wings down.
Aren't they so fun?  I love how these beautiful papers and designs can "come to life" so to speak
with just a little glue and love.  Yes, cheesy, but it is for Valentine's day....:)
The hardest part was making up the template. Here's a shot of the ones I used, yes, they were eyeballed and cut out of notebook paper that was in front of me. I would probably recommend using card stock or card board from a cereal box~it would ease the tracing.
Having all boys I can only get away with this with my youngest who is 3.
He didn't care as long as there were treats attached.
Now only 3 more ideas to come up with.....

Tomorrow Nicole has her daughter's duck themed Valentines to share, you won't want to miss out on them~they are hilarious. Good luck all you procrastinators~we're in the same boat, but at least we have Downton Abbey to watch while we work!

Friday, February 1, 2013

Love Shack!


Yup, I said Love Shack!  It's fitting though right?
A couple of weeks ago I was enlightening my daughter on all things of my youth including all the crazy songs that our little brother and I would sing at the top of our lungs as we drove around our yard on the 3 wheeler. I've completely dated myself haven't I?  I'm sure our neighbors thought we were completely nuts.
Well I still want to dance every time I hear the song and want to call my brother and sing it to him over the phone.  I'm sure he's glad when those calls go straight to voice mail.:)
Well Candace and I always love playing around with Valentine candies and I got the best Gingerbread house mold before Christmas that I never got a chance to use.  It's a Pampered Chef mold from 20 years ago!  (Thank you Ebay!)
We decided to use sugar cookie dough instead of gingerbread and it worked great.
Be forewarned though~it takes a lot of dough!  One single batch of our Mom's Famous Sugar Cookie dough makes one house.  Make sure to cook the dough a bit longer so it's nice and brown around the corner and will be extra strong for the house.  I cooked mine about 12 minutes each.
 Gather some great treats!  Keeping them separated in a muffin tin worked great!  The hardest part was keeping Daddy's hands out!

The frosting is the most crucial part!  You have to have some serious "glue" and I always get nervous about the kids licking their fingers with raw egg white in Royal Icing.  You will love Wilton's Meringue Powder!  It contains pasteurized dried egg whites and it's so easy to use.
The recipe is quick and easy too!

Wilton's Royal Icing
3 Tablespoons Wilton Meringue Powder
4 cups sifted powdered sugar
6 Tablespoons of water

Beat all ingredients at low speed 7-10 minutes until icing forms peaks.  Makes about 3 cups.

One batch was enough for us to put together 2 houses.  The frosting dried rock hard and fast!
This was such a fun project to do and the kids had so much fun!

Now to fill up the Valentine advent calendar and get out the rest of the Valentine decorations I procrastinated getting out.....

If you are looking for some fun Valentine printable freebies make sure to check out some cute subway art
for every season by Elise at Halloween Costumes.com

                                                 Valentine's Day Subway Art Printable
and......if you're in the mood for some B-52's.....click the picture!
Happy 1st of February!


Wednesday, February 8, 2012

Valentine Candy Bouquet


 This is what happens when I am stuck in the house recovering from being sick with limited access to crafting supplies...I get creative with candy! I didn't have the energy to hit the craft stores, so my major shopping trips were to the grocery store. It's amazing what you can find if you look hard enough!
I have a hard time passing by the Valentine bulk candy without stopping to fill a bag.  Red and pink gumdrops, jellybeans, red hots....I can't help it!  They are just so darn cute.  I also found Valentine candy corn. Gross to eat, but they make perfect petals for flowers.  
  
For the base of the candy flowers, I used Styrofoam discs that I painted red with craft paint.  I poked the small dowel into the Styrofoam disc and added a bit of hot glue to stabilize the foam. 
Each piece of candy was added with a hot glue gun. I made sure to use a low temp gun to avoid some serious burns to the fingers!
I also grabbed a bag of gummy ring candy (Peach O's) at the store that fit perfectly around the large gum drops. 
For the heart shapes flowers, I used heart shaped cookie cutters to cut into the foam. The cookie cutters worked surprisingly well on the foam!  
I gave it a good crunch with the cookie cutter and then cleaned the rest up with a knife.  I think the red hot hearts are my favorite.

Painting the Styrofoam the same color as the candy helps to hide the gaps.

 Nicole and I have made candy topiaries a couple of times, like the Jelly Bean and Halloween topiaries.
(I missed Nicole this time...she didn't want to catch what I had!) In those cases, we used Styrofoam balls, which are easier to place candy around.  You have to get creative with candy placement on the discs. 
I filled the edges of these flowers with red hots to avoid getting too bulky.

I hot glued layers of Styrofoam into the glass vase, making sure there was room for the jellybeans to fit along the side. Next I added the flowers, then filled the vase with pounds of jellybeans. I used heart lollipops to fill in the empty spaces. All of the stems were wrapped with green floral tape and the heart leaves were made from scrap paper.
It's nice to know I can still enjoy Valentine's candy without having to eat it.  It's also a lot less tempting to eat when there's gobs of hot glue on each piece! :)

  A Little Inspiration


Friday, January 27, 2012

Love Notes

This week I had my Sunday school girls Activity Day
and my teaching partner and I decided to help them put
together some Valentine envelopes so that they could 
exchange anonymous admiration notes to each other
for our upcoming Valentine party.


My teaching partner Jill is one of the most creative people I know~
she is seriously amazing and we'll have to show off her crazy talent here soon!
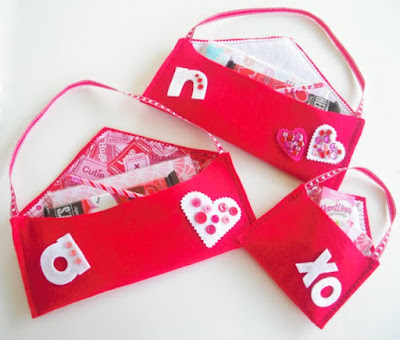
She came up with these cute envelopes that we let the girls,
who are 8-11 years of age then decorate and sew buttons on.

Of course I had to come home and make some up for me!
Candace has a houseful of sick kids this week and is under the weather too
so we have stayed clear except for the quick~Purell soaked hands~exchange
in my driveway for the pinking shears.:)  So this week I am missing my sis and her camera 
with the great pics she takes!
I love the elongated size of these envelopes and they were the perfect fit
for all those goodies we love to grab in the dollar bin at Target!
I made a couple to take to some of my friends
and even did a smaller version to hold some cute note cards I found too.
Here is the pattern I made up with the measurements~
We used primarily felt but I had to try one with some of the cute Valentine fabric
for the liner that I found at Hobby Lobby.
Some of the fabric was so cute I actually got some to make a dress for my daughter....
we'll see if that ever happens.  Probably by the time I get around to it, it'll have
to be a mini-skirt or something.:)

Pretty easy and pretty inexpensive to make
and it's for sure something you and others will love to get!

Tuesday, January 17, 2012

Valentine Pennant Banner

There's nothing like a trip to the craft store to get our Valentine creative juices flowing.
We took a stroll through the scrapbook department at Craft Warehouse and fell in love with a line of Valentine paper by My Mind's Eye.  It's called "Love Me"
Once we saw the whimsical valentine pennant print, we knew we had to have one in "real life" size.
  We really don't need another pennant banner, ah...but the papers are so fun!
To make the banner, we picked up 3 x 2 1/2  inch chipboard pennants and chipboard hearts.

For the other pennant sizes, we used the paper cutter to slice squares, rectangles, 
 and a couple of larger pennants.
  
We used Mod Podge to glue the papers to the chipboard.
Then we used a small hole punch to make holes for the string. 
 It takes some muscle to punch through chipboard and a layer of paper!
It's so easy to make!
We might have to head back to the store to stock up on this cute paper before it's gone!

Wednesday, January 11, 2012

Valentine Picture Tree

We can't go into Target without heading straight for the dollar bins,
 especially when it's filled with Valentine's stuff. 
They had the cutest little Valentine trees,
 so two quickly went into our carts. 
They had a lot of potential! 

Here's a picture of the original tree....
 
Very cute...and very red.
Nothing that a little spray paint can't change.
We ended up painting the trees with Krylon Brushed Nickel spray paint.  
 For the ornaments, we had so much fun playing around with
a box of epoxy resin that Nicole bought three years ago. 
 At Hobby Lobby we found some embellishments and
metal bottle caps in the jewelery section  to make our resin filled ornaments. 
First we printed off thumbnail prints of our family members we love..
that includes Nicole's cats and squirrels. 
Yep, if any of you are new... Nicole is a squirrel whisperer
that has rescued several dying baby squirrels. 
We decided to make our own picture ornaments instead of hanging Valentine ornaments. 
It was the perfect opportunity to use that box of epoxy resin. 
It only took us three years to figure out what to do with it and these were perfect!.
We had tons of fun playing around with it and are already thinking of other ways to use it.
We used a product called EnviroTex Lite Pour-On in high gloss finish.
It was our first time playing around with it and we of course learned a lot. 
A little goes a looooonnnnnggggg way.
First, make sure your two part mix is correct with equal parts.
We marked with a sharpie equal spots down each bottle to help us measure accurately. 
Second, glue your pictures down. 
A glue stick might be a good idea so it won't ruin your picture. 
Third, there are tons of bubbles, so use popsicle sticks to continually press
the poured mixture to clear the air bubbles as the resin sets up.
 
Resin will be completely cured/dry in 72 hours.
Nicole wrapped her base with cream burlap while I gave mine
a pleated look with silver tissue paper.
We used the prettiest light pink pearls to dangle
from each ornament and matching ribbons for the bows.
Of course we had to add a little "frosting" of glitter too on the top of the pot and heart.
Two different but similar takes
and two very happy results!
I think these guys are staying up all year round,
they just make us happy!
Related Posts Plugin for WordPress, Blogger...