Sunday, October 31, 2010

Happy Halloween!

 Happy Halloween To You!
It's hard to believe that we survived this week
with all the school Halloween parties and projects,
(Candace's little guy also dumped a whole bottle of green food coloring on her living room carpet!!)
but somehow we did!
Our kids are already comatose from all the candy they've gathered
over the last few days and we are glad for a little bit of peace
before this next week begins!
Last night we went to a trunk-or-treat and a Haunted House that was so fun!
I even got my hubby to don the Elvis costume again!
There were people actually driving by,
 stopping to ask to get their picture taken with him!  It was hilarious! 
Candace got some great pictures but her computer has a wicked virus right now so we'll post those soon!
We have 3 consecutive weekends of Holiday Boutique's
that we are busy busy getting ready for,
as well as 4 birthdays, 2 classes, Star Student, Parent Teacher Conferences....
and the list goes on!
We'll be posting some of our fun crafts we're making for
Thanksgiving and Christmas too!
But for now....
I'll be enjoying the sweet and thoughtful gift
my friend Beth brought by to me which she does every year! 
She got these cute pumpkin bread bowls from Great Harvest Bread!
Isn't it amazing how cute a little ribbon makes things?
Ahhhhhh no cooking today!!!!!
Hope you all have a Happy Halloween!

Thursday, October 28, 2010

Recipe for GAK or Slime

We have been getting ready for Halloween around here! I was (crazy) enough to volunteer for my son's 4th grade Halloween craft in his class tomorrow. My son has hit the..."I'm too cool to make kiddy crafts" phase. So, I had to get creative.  I volunteered to help them make slime.

This is a great recipe! My friend Amy, a 3rd grade teacher, directed me towards this recipe for Gak.  She makes this concoction every year.
It's from Steve Spangler Science, recipe for GAK
(Check their site out for full directions.)
You will need:
Borax (1 tsp mixed with 1/2 c. water)
8 oz.Elmer's Glue
Water (fill empty glue bottle with warm water and shake)
Green food Coloring ( couple drops)
Mix glue and warm water. 
Add in combined Borax and Water,
Mix away until you get the right consistency!
Seal in a plastic Ziploc when you're done playing!
Lovely! :)

You can add some bugs too...if you like!  

Now...I need to go make several dozen bat, ghost, and pumpkin sugar cookies!
My other son is in need of Halloween treats for his class.
See you soon!

Sunday, October 24, 2010

A Little Batty...


Yeah, I feel a little batty for still making more Halloween decor when it's a week away. But, I was strolling through the Halloween posts on Design Dump and was inspired by one of the pictures Autumn posted.  Great post(s) by the way, many ideas I have never seen before.

 The picture reminded me of the very cute bats Nicole made for a boutique several weeks ago.  She had mod podged the bats with these papers (5 for 1 buck) found at Hobby Lobby.  She sold out very quickly and I have been dying to get my hands on some. 
 Nicole is "crazy" busy right now and probably not too anxious to cut 15 bats out- for free- for her sister.  I popped in to snag her bat pattern from her and I think she had at least 60 tiny turkey feet-sanded & painted- sitting on her counter waiting to be assembled to the body!
So, I went home and pulled out the scroll saw and carefully cut these bats out. I know Nicole's dying with the bad cuts I made.....if you want some of these (cut by Nicole :)) you can order them here. She's a pro and her bats are just about perfect!
Using Mod Podge, I papered the bats, sanding the edges for a nice finish.
Instead of putting the spray painted black branches into a pumpkin like the inspiration picture, I used a large green vase. I still love the idea of the pumpkin. I had set them temporarily in the vase and it looked pretty good...so I kept it!
I printed a little "spooky" sign to dress up the vase.
Nicole originally had her bats glued onto dowels and anchored into wood blocks. She drilled the bats at angles to add some interest. With some of the extra bats I mounted these little guys into a 2x4 and I added a little spider yarn here and there. I could use that stuff on everything. Does it come in red for Christmas? :)

 Take a peek at the metal spiders I found at Marshall's. They always have the best (and cheap) seasonal home decor. The little metal spider holding the pumpkin I found at a local home decor store.  He was too cute to pass up, I brought a bat home too.  Hmmm...I wonder how we could make these?
For the ornaments, we used eye hooks to hang the ribbon.
I can't believe we are a week away from Halloween.  I still need to round up a couple of costumes.  Does anybody have any great costume ideas for an 80's themed party?  My husband and I "have to"  dress up and my mind is blank. (we don't get out much) Feel free to send any ideas our way!

Thursday, October 21, 2010

Aqua Gem Halloween Fun

 
Our mom went to a luncheon and saw the cutest game themed centerpieces. Small square vases were filled with game pieces and sat on a checkerboard. Our mom was commenting on how cute everything was and the ladies told her to feel inside the glass jar.  She was surprised to feel that it was full of tiny gel balls.  The gel balls helped to stabilize the game pieces but from afar gave the appearance of water.

We thought it was pretty cool so we headed off to Jo-Ann's to pick up some Aqua Gems.  They are about 5.00 a bag- but make a lot!  Have any of you tried these?
Add water and they start expanding!  I ended up filling about six good sized jars with two little bags. The longer they sit in water the larger they get...up to 1/2 inch in size.
The best part is.. the color won't bleed.  Say....if your 3 year old knocks them over...all you have to clean up is water and a gazillion balls! :)
We decided to fill our vases with scary little plastic creatures.  My boys were in heaven!
They thought this was the "coolest" craft we have ever made!
They couldn't keep their hands out!  The little balls shrink when left out of water and they had so much fun testing it out. 
**I do have to warn you**
If you have kids that are prone to sticking things up their nose...this little project may not be a good fit!
My older sons were teasing with some of the longer malformed balls, holding them up to their nose....you know...because they're green and all....while my three old was observing.
A little bit later I heard the three year old  say, "Look Mom!" 
"Honey...don't stick things up your nose!!!"
~Sniff~
Uh-Oh!!
Several sneezes later and some frantic crying the little green ball shot out!  It could have been much worse.
They feel so squishy and slimy...perfect for a Halloween party or haunted house.  At Jo-Ann's they also have waterproof tea lights to light up your aqua gems.  They were seventeen dollars for a pack....so I passed.  But they would be cool!   
 We made a little spider arrangement using some spray painted thrift store flowers
 and branches from the yard.
The brighter bugs I found at Walmart in the party favor section. 
My kids were so excited to fill the vases with creepy things and hunted the house down for extra eyeballs and spiders. I knew that plastic eyeball from the dentist office would come in handy!

The gems come in many colors, like orange and purple. We sound like an advertisement....but they are so much fun!  We love how they keep all the objects in place.

They are so fun I don't think YOU will be able to keep your hands out either! :)

Join us Saturdays at tatertotsandjello.com for the weekend wrap up party!

Winner Winner.... TURKEY Dinner!


After many failed attempts to post the Random Number Generator on the blog....we officially throw our hands up!
Here's the lucky winner of Nicole's Turkey and Pilgrim set:


Congratulations Emily!

If you missed your chance at winning, you can also grab these in Nicole's ETSY Shop!

Thanks for all the sweet comments and words of encouragement. 
 It was so great to hear from so many of you!
We love hearing from you!!
Thanks again...here's looking forward to another great year of crafting!!!

Friday, October 15, 2010

"Plump" Fall Wreath

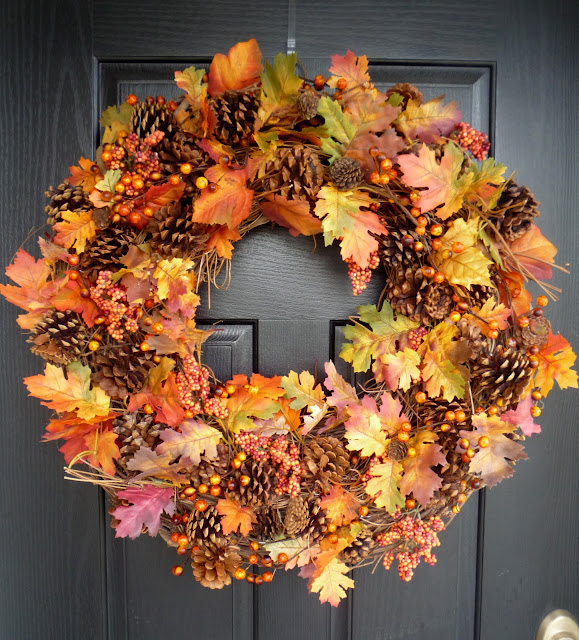
Yes, I did make another wreath.  I cleaned out my scary closet under the stairs and found oodles of leaves, pine cones, and berries.  The leaves were 88 cent bunches that I bought at Wal-mart when I made my first fall wreath ever six years ago. I had never glued them into the wreath and found them tucked away in a bag.  
Yep, don't be afraid of an ugly old wreath from the thrift store. You can find so many tossed aside wreaths and crafts gone wrong. (I just donated a few I found under the stairs! :)  Just give it a good vacuuming!
Last Christmas I saw many bloggers double up their fake pine wreaths and it made it look so much thicker and fuller.  I found a smaller grapevine to wire into the middle.
I used brown wire to put them together, pulling tightly.
There were a few gaps, so I added some leftover branches that come on the grapevine garlands.
I wired those to the doubled grapevines. The pine cones helped fill in the rest.
The person that owned the large grapevine had wired on a coat hanger.  It actually works really well and blends too. 
I took the brown wire and cut into little pieces to tie the berries onto the wreaths.  I glued the pine cones on after that and tucked the leaves in.  If you want it more permanent, I'm sure you could use wire or picks to add the pine cones and berries. 
I love it on my door...so big...warm and welcoming!

Wednesday, October 13, 2010

It's Our 1 Year Blog Anniversary!!!

Has it really been a year since we started!?!? 
We can hardly believe it! 
I remember about a year ago I stumbled upon a couple of blogs
that were DIY building, decorating and crafting. 
All done by "normal" women out there. 
Mostly moms, housewives, women of all ages...and I almost fell off my chair! 

I was so excited to see other ladies with some
of the same....extreme hobbies as Nicole and myself. 
The part of blogging that we love most is the
interaction, learning, inspiration, kindness, cheer leading of
 "you can do it"  gals and the friendship we have gained. 
How great is that?
 We can sit in our house in Idaho and mingle with crafty women all over the world!

I slowly suckered Nicole into reading blogs,
calling her daily...."did you see this?....did you see that?"
We have loved to dabble in everything from crafts to power tools for some time,
Nicole had even moved on to table saws, scroll saws,
compound miter saws, and routers with
her wood lettering business but we have learned tons too through the power of the
Internet and blogging.... we learned to
cut our own crown and overcome the fear of a miter saw!!!
It's been fun to learn how the blogging world works,
from taking pictures to the writing, a lot of learning IS taking place! :)
We use a lot of these "", and ........ :), and most of all these!!!!!!!!!!!!
What can we say.....we are ANIMATED!!!
When I read our writing, I often think of Chris Farley....."in a van DOWN by the river"!
Thanks for still reading! (ha,ha)

We thought we would take a  little walk down memory lane and peek through some of our favorite projects.

It all started after being inspired by Thrifty Decor Chick's shelves. How great is it that you can make something beautiful for your home with your own two hands and with little money.

We love to use power tools!  Especially when it involves crafting with wood. 
We have a blast building together! 
We obviously love wreaths! 
We promise...no more ornament wreaths....we got a little carried away last year!
 We love to craft with papers!!
This is Nicole's specialty as she has a business cutting wood letters and shapes
and then modging podging paper.
We learned to cut crown moulding...and it's not that bad.  You all should try it!
And...we love a good topiary!!

Thanks to ALL of YOU for taking the time to read our blog! 
We love doing this... creating is our passion!!
We love working together and feel so lucky to live by each other
so we can dabble in our hobbies together.

In honor of you, we are doing a little giveaway.
Nicole's been busy making pilgrims and turkey's
and we wanted to share them with you!
Please make sure to leave your name and a way to contact you to claim your prize!
All you need to do to enter is leave a comment!
THANK YOU!!!!!!!
The giveaway will end in one week.

We were featured over at Today's Creative Blog today! 
 If you would like to see the very kind write up, go check it out here.
Thank you Kim!!
And a hardy welcome to all of our new Visitors!!


Monday, October 11, 2010

A Project (6 years!?) in the Making

I decided this weekend to finally finish something I started 6 years ago!
Sadly, it's the first thing people see when they enter my home.
Do any of you have problems finishing things?

Six years ago, this cubby had no shelf,  just drywall. I begged  my sis-in-law's carpenter- building her home, to router a piece of mdf for me in return for cinnamon rolls. I glued and nailed it into place unpainted and unprimed.
2 1/2 years ago, Nicole helped me paint my house (my poor sister!) and we painted the back wall of the nook a darker shade of paint.
One year ago, I glued and nailed on a piece of trim underneath the shelf....still unpainted,
just primed.
This weekend, I was determined to finish it until the end...even if it didn't look exactly as I imagined. 
I painted the entire wall and the nook,

Then  I FINALLY painted the shelf!
Using this awesome Purdy brush I won from Gail at My Repurposed  Life.  I have been saving it for some real painting and it worked wonderfully.  I believe Gail is one of the nicest diy bloggers out there.
  Look...she even left a note! :)
BTW...Gail, I cleaned the brush properly and put it back in the original package for safe keeping! 
But...the weekend of painting did not go so smoothly. My little monkeys are what keep me from tackling the painting projects.  Half way into Saturday, my husband was with one son at football,  my younger boys were running around playing guns while I was distracted painting.  One knocked the little one over into a corner of a baseboard and one hour later we were in the Quick Care getting his head "super glued" or Dermabonded back.  That stuff is really cool...I think all mothers should have a bottle of Dermabond in their first-aid supply.  Although, there's always the risk of it being used IMPROPERLY..... he,he :)
The last step was hanging the mirror. That always puts the fear into me! 
 I found the studs and one anchor and I think it's solid.
I added a few decorations...and I'm done! 

Yay....Hooray!
   
Related Posts Plugin for WordPress, Blogger...