Hi everyone!
It's time again for Wood You Like To Craft?
If you haven't heard yet, Wood You Like to Craft? is a monthly wood craft group. We are excited to be hosting this month! Sassy Sanctuary, Craft Goodies, and Under My Umbrella, will be guest posting here and sharing their spin on May's craft.
This Friday, we will run a week long linky party, so you can join in on the fun!
This month we decided to make toolboxes!
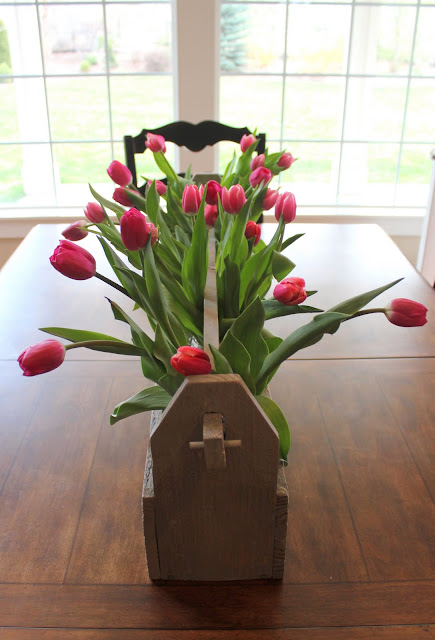
Candace is a den leader for cub scouts and they made similar toolboxes. Yes, right in the Bear handbook, you will find complete directions for making a simple toolbox! :) We thought they would be really cool for home decor, or used outside as a planter. So, we changed the size and shape just a little to fit a long table. Our planter is three feet long, twice as long as the cub scout toolbox. We also used a 1x2 as the handle instead of a dowel.
Materials needed:
2 (6ft) boards. (We used cedar.)
1x2 for the handle, or a large dowel
small dowel for handle pin
small dowel for handle pin
jigsaw, and a saw for straight cuts
wood screws
drill
paint
We cut one board in half to make the two long sides of the toolbox. Each board was just under three feet.
Next, cut your bottom board, subtracting the thickness of the cedar board twice.
For the ends, we cut two boards at 12 inches.
Put it together to see if it all works...
We used a miter saw to make angled cuts, but you could easily use a hand or miter saw.
We cut at 30 degree angles on each side of our (2) 12 inch end pieces.
We used a 1x2 for our handle, cut holes on each board if you want the ends of the handle to poke through. The cub scout planter uses a round large dowel for the handle.
You can either put wood screws in the end or use a large drill bit to cut circles.
To cut the handle opening, you begin with a few drill holes wide enough to maneuver your jigsaw.
Cut in an "X" shape until you carve out your rectangle.
If you use a round dowel, you can drill large holes, or use wood screws.
Pre-drill holes and use wood screws to attach box.
When picking out boards, be careful to pick flat, straight boards. Ours were a little warped and the box doesn't look as straight.
To keep the handle from slipping, we drilled a hole in each end of the handle and placed a piece of 3" long dowel to pin it. We gave the toolbox a coat of gray paint and distressed the cedar after drying with sandpaper. We finished it with furniture wax for protection.
We filled our toolbox with mason jars of fresh beautiful tulips.
They were gorgeous on the dinner table!
We love that our toolbox planter is sturdy, contains the glass jars and water from tipping by little hands, and there's little worry about water damage.
The toolbox is super easy and a fun beginner wood project!
Tomorrow, Krystal from Sassy Sanctuary will be here to share her take on the planter...it turned out great!
Come join in on the fun!
What would you do with a toolbox?
The Linky starts Friday and runs for a week!
Next Sunday, we will showcase the Wood You Like To Craft? "Top Cuts" and the winner will receive a prize!


5 comments:
It's SO pretty! The tulips are just lovely. I have to admit that I had a hard time coming up with my version, because I'd have been happy to just copy yours exactly!
Can't wait to see what everyone does!
Um.. love this!! I have the wood already because I have been dying to make a tool box!! I am totally doing this one!! SO CUTE!!!!
WAY cute! I love it. My husband has been looking for something to make with his YM for their mom's and I'm totally going to show him this. Can't wait to see the others!
The possibilities are endless. LOVE this idea.
I can't wait to get started on my own. Thanks for the great tutorial.
this turned out GREAT!!! good job friend!
Post a Comment
Note: Only a member of this blog may post a comment.